A review of the Brickstuff Lego Eiffel Tower Lighting Kit
Recently I just finished my Lego Eiffel Tower kit, and boy is it quite the set. 10,001 pieces full of agonizing repetition, despair, and pain through 74 bags…but once it’s done, it’s gorgeous. Standing at 58 inches tall, the thing is huge - it’s a display piece in your apartment or home.
Now, if you’ve ever been to Paris, you’ll know that the Eiffel Tower tends to light up at night - and sparkle for 5 minutes at the top of the hour. And when it comes to lighting up a Lego set, the Eiffel Tower probably sits at number 1 for “Lego sets you want to put lights on” (perhaps to the dismay of some Lego enthusiasts who would argue that a light kit can go to another set)
There are plenty of people who will sell you light kits for the Eiffel Tower - all the way from $60 with Game of Bricks, to more premium brands like Light my Bricks, in which their set is $444 for 268 LEDs, including the lights at the bottom of the Lego Eiffel Tower.
Then, enter what has to be the most overkill light kit on the planet for the Eiffel Tower - the Brickstuff Premium Lighting Kit (for the Eiffel Tower). With 503 full RGB LEDs + 32 white LEDs for the broadcast tower to emulate the beacon at the top of the real Eiffel Tower, full Wi-Fi control via WLED, and support for a 48-LED addon for the streetlamps at the base of the tower. Price? $499 for the base light kit, and $199 for the street lamp add on. I chose to go with the base light kit, and perhaps I’ll add that on soon.
First and foremost - this is not a cheap light kit. The base + streetlamps kit costs more than the Eiffel Tower itself, and once you include the cost of the Eiffel Tower set itself, you’re looking at $1,128 in total with the base light kit, and $1,327 with the streetlamps.
If you are not obsessed with your LEGO Eiffel Tower, don’t plan to light it up often, do not want automated sparkles on the hour, don’t need Wi-Fi control (most people don’t), or don’t have the technical knowledge on how to operate WLAN, do not buy this kit! There are plenty of light kits that are simpler to build & control that will do the job and make your tower look wonderful.
Nonetheless, you do get a lot for your $499, plus you have to consider that Brickstuff is a small American business, and that ultimately does increase costs a bit. To be fair, as an American, I love supporting American businesses, and this is the only Eiffel Tower light kit that can be controlled via Wi-Fi, so it’s a match made in heaven for me.
I won’t go too much into the packaging and unboxing - but everything is laid out nicely into three boxes, and then supplies containing the LED light strips plus a couple other accessories, your shipping invoice, and a QR code to the build guide. Of important note - the Brickstuff kit is 503 LEDs on 16x 13 LED strips (bottom/mid tower), 8x 17 LED strips (top tower), and 8x 20 LED strips (also top tower). Lighting comes only from the legs - however, this is more realistic to the actual lighting of the Eiffel Tower, as other light kits end up lighting the archways at the bottom in their always-on operation (in reality - the sparkles do traverse the arches, so I guess it’s more accurate for sparkle operation).
Assembly took about 6 hours for me and was…reasonably complex. Brickstuff includes a guide on how to assemble the tower, but once you start getting into the instructions it’s pretty simple. Things start off by wiring in a USB-C port into the leg of your Eiffel Tower, using one leg to bring up the main power cord, putting in a custom PCB that has the light controls + WLED coprocessor, then starting to build 3 loops up the tower for the LED strips.
A lot of the assembly is putting on sticky pads on the back of the strips, trying to get the strips into the legs of the tower (it’s tricky and takes time, but you get the hang of it at some point), and using little interconnect boards to make a loop of four 2x LED strips for each leg. Wire tidying up isn’t too important at the lower & mid sections of the tower, but you just have to be careful to mount the LED strips with about an inch or two of clearance above the end of the leg so you don’t have cable tension issues. After about 2 hours, I completed the bottom tower.
The mid tower is mostly the same, although with some added complexities. Your first job is to wire a tower interconnect board which is a really great idea - separate the electronics of the tower into the three (well four if you count the broadcast tower) logical parts of the Eiffel Tower. The issue is that these cables are a lovely red/green/blue/black and do not blend in with the tower at all. And these wires are thick! You will see them! In the images on the Brickstuff guide, some of their interconnect cables are black, and I wish they were black because that would genuinely look much better. I know this is a small thing to nitpick on - but the light kit does cost $500, so stuff like this matters.
Otherwise, wiring up the mid portion of the tower wasn’t too bad and took another 2 hours off of my life. I had some snags with ensuring the right female/male connectors were going the right way for the interconnect at the mid level, but once that was resolved, everything was good to go.
The third and top layer of the Eiffel Tower is probably the trickiest part (but only if you read the manual verbatim!). You’d think it wouldn’t be too hard though - at this point, the tower gets simple enough and you’ve done enough assembling that you know what’s going on - two light strips at one corner, one 17 LED strip attached to the 20 LED strip for the upper upper segment, round 4x to make up the loop.
In this upper segment, you can pretty easily detach the lattice work because it’s no longer a full square in the lower & middle layers. The first steps in the guide tell you to detach one of the latticework panels to wire in the LED for the broadcast tower, and I ultimately found it much easier to take off both latticework panels (top and bottom), put in the LED strips, then put the latticework panels on top of the LEDs and adjust the individual lattice pieces to fit, repeating this 3x to go around the tower. Fishing the LEDs into this part of the tower where it is very wobbly and fragile is probably a recipe for disaster…so I’m glad I went this route. Only qualm with this approach: you have to make sure the latticework panels aren’t popping out of the tower structure - check the side profiles carefully.
The disassembly to add the 32 LED strip at the top (to simulate the beacon) is pretty simple - and the instructions are nicely written. Ultimately, I have one gripe to pick - you’re tasked with increasing the height of what’s supposed to be the windows for the indoor observation layer of the tower to put the LED inside of. If you’ve never been to the top of the Eiffel Tower (which I have before), this is an annotated diagram on how it looks on the Lego Eiffel Tower:
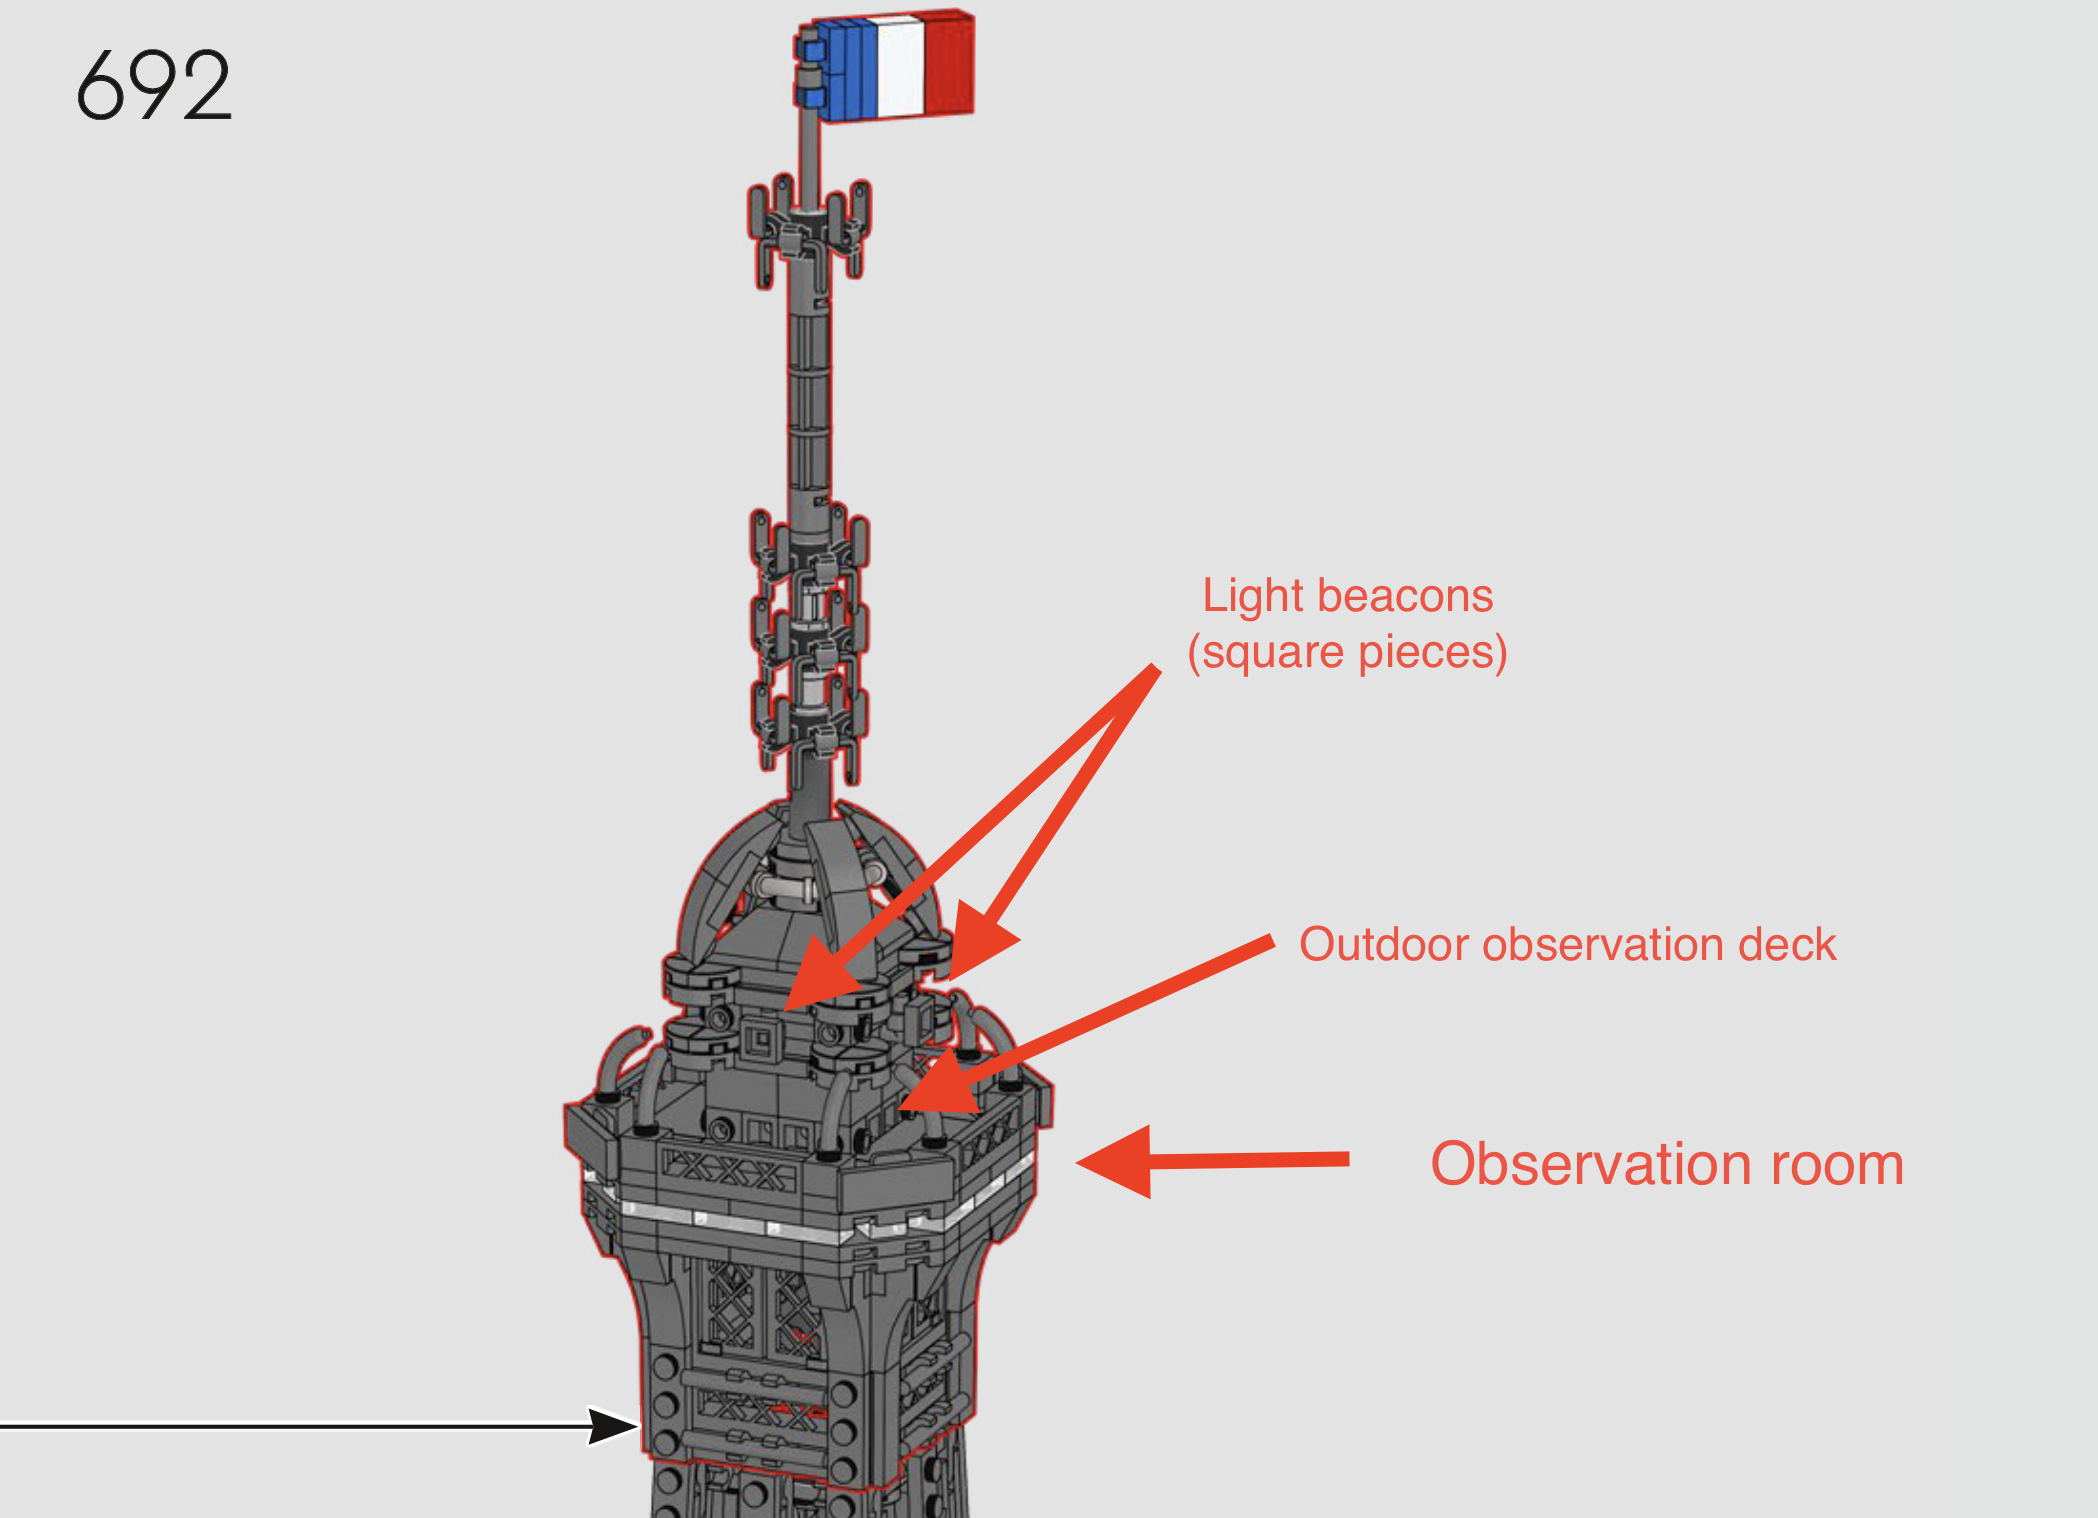
So you’re basically blinding everyone in the observation layer (room). Womp womp. I digress though, it’s really cool that Brickstuff even did this on their light kit - none of the other ones even try to emulate the beacon.
My other gripe to pick at the third layer is that the control wires (used to go between the interconnect boards for each pair of light strips) are too long up here! They’re a great length at the lower & middle tower sections, but there’s so much wire clump at the third level that could’ve been avoided with shorter cables.
The guide tells you to tidy up the wires by twisting them into a bunch in the dying moments of the guide:
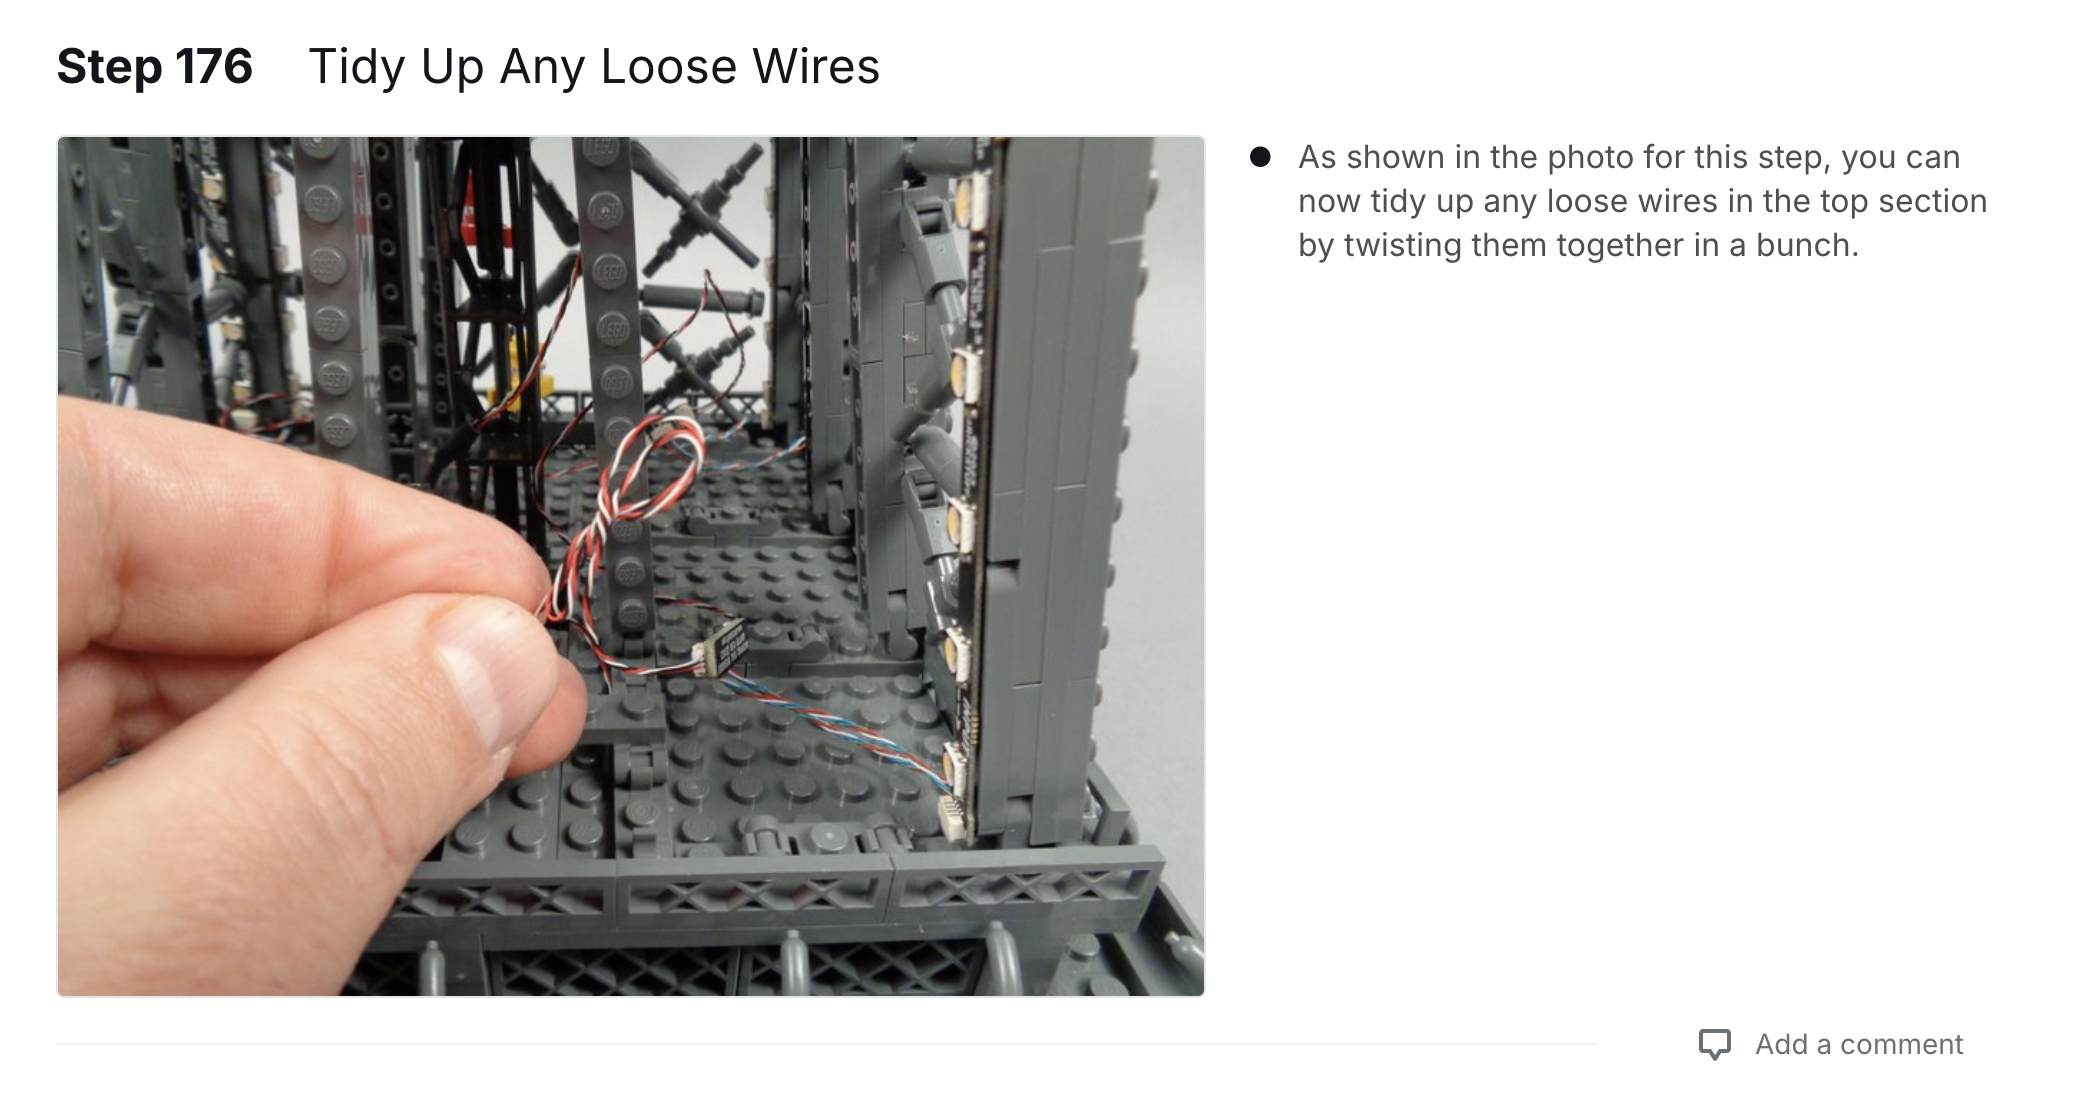
But for the life of me I could not even try to get them tied up because these wires are VERY tiny and not easy to manipulate. At this point, it was about 6 hours into my assembly of the light kit and I just wanted the lights to come on, so I didn’t bother cleaning up the wires at the top. My point remains about using shorter wires though - they’re too long for up here (so long in fact that the top-level interconnect board can dangle out of the top level by an inch or two and the control wires have slack!).
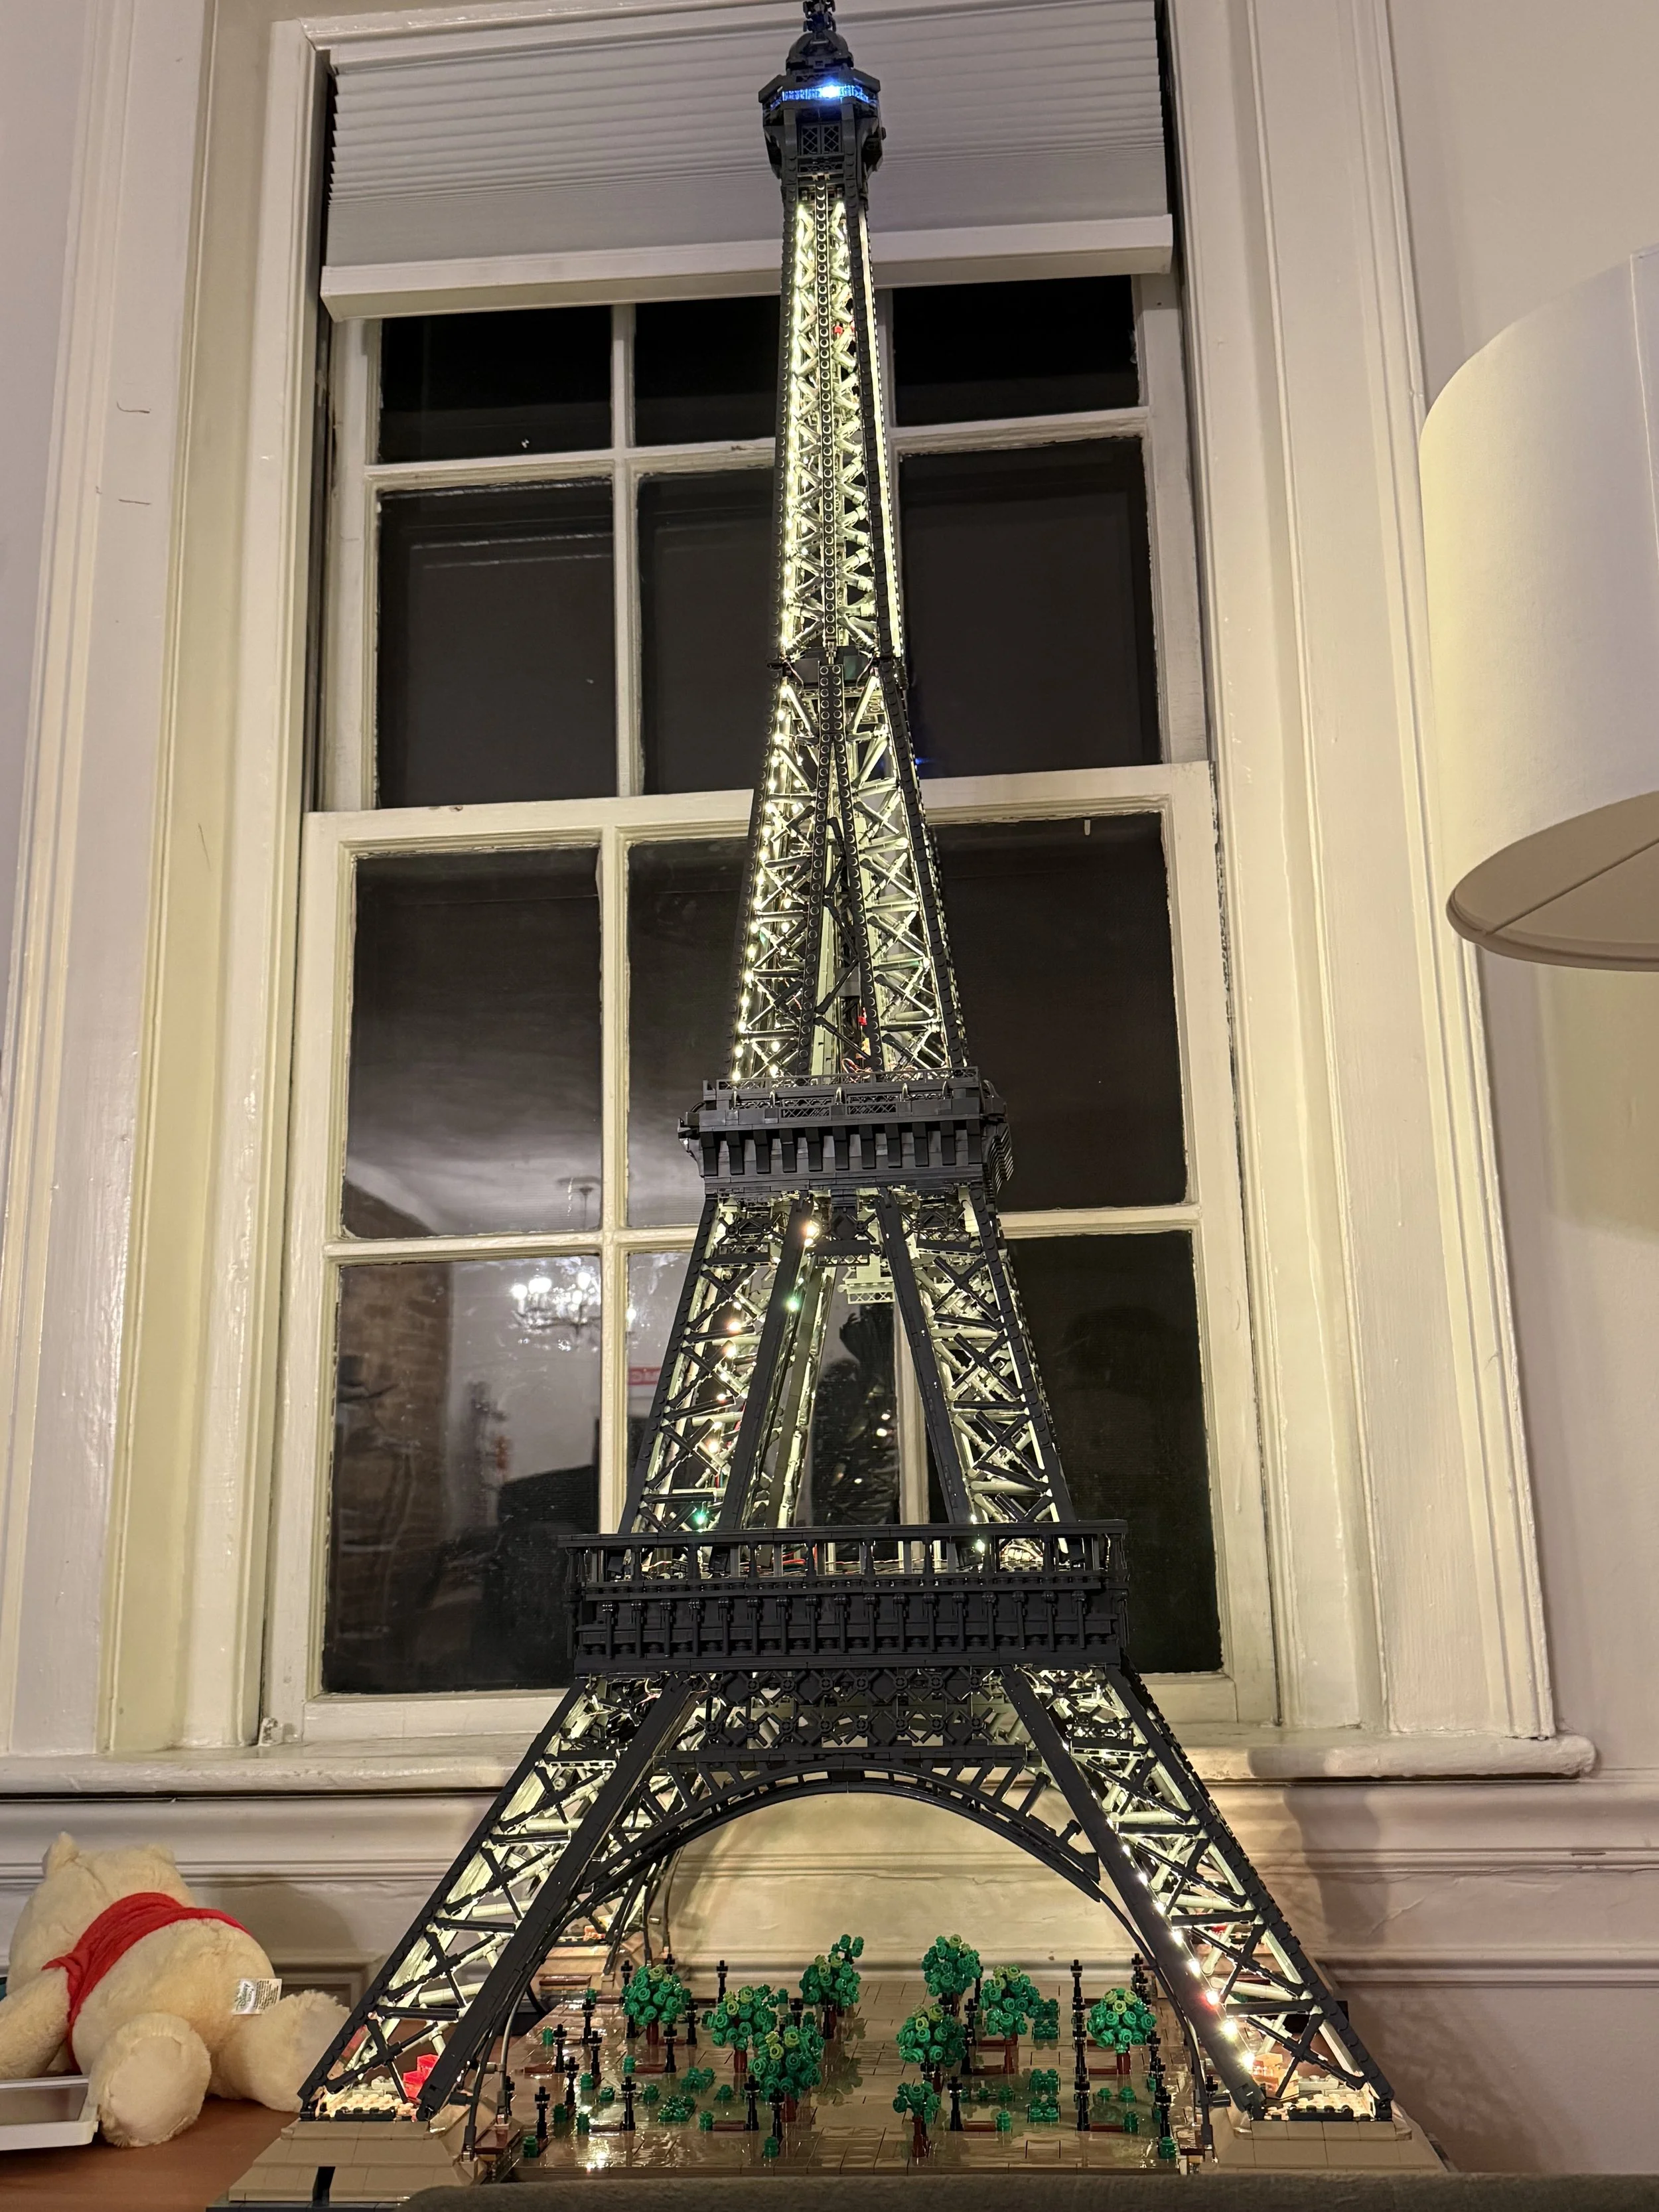
Another little gripe about this light kit is that - while it has the emulated beacon effect at the top, I wish the lighting went a bit higher towards the broadcast tower because the light kit cuts off just before the top, which is a little bit awkward. Check out a (hopefully legal) photo of the Eiffel Tower at night to see what I mean. I think a few more LEDs up at the top would’ve really completed the look - from up close, it looks like 90% of the tower is lit up but the broadcast tower was completely forgotten about. Most other light kits will put at least a few LEDs up here and I would’ve loved to see that on this light kit.
But, once is all said and done, you turn on the tower and it looks…incredible. The lighting is very well done - bravo Brickstuff, and just like the build of the Eiffel Tower, all the pain and agony of putting 32 individual light strips onto the Eiffel Tower, plus wiring it all up, seems to fade away in an instant.
Sorry for the really long image Squarespace kinda sucks at images
And onto the nerdy part of this Eiffel Tower light kit - now you can say that your Eiffel Tower is on the Wi-Fi! No, really!

This is the coolest part of the tower and the part that makes it worth the $500 in my opinion - full Wi-Fi control via WLED. WLED is an open-source software that runs on a bunch of microcontrollers to control LED displays, this Eiffel Tower included. The engineers at Brickstuff decided on an ESP32-C3, which is a respectable RISC-V microcontroller that’s still pretty modern (no ESP8266 here!), and yes, you can say your Eiffel Tower also runs on RISC!
The Brickstuff engineers have WLED pre-configured with the top, middle, and bottom segments loaded in, the tower design configured perfectly, basically, you plug it in and start screwing around with WLED to your hearts content. The Brickstuff engineers also included 31 lighting sequences you can control via a remote you get with the tower, or in WLAN with presets, and they all look great! There’s a 32nd sequence for the famous Eiffel Tower Sparkle - it runs it with the lights off so it’s just the sparkle for a dramatic effect (of course, this being a smart Eiffel Tower, you can configure the sparkle to be with the lights on so it’s more realistic to real life - that looks great too!).
There are plenty of apps to control WLED devices, and there’s Alexa support, programmatic access via MQTT or a JSON API, and so much more you can do. This is the huge selling point of the Brickstuff kit - once you get this thing on WLED, the possibilities are endless. It’s 503 LEDs you can do…anything with*. My hope is to do some programming to get the tower to come on after sunset each day automatically, then sparkle at the top of the hour - pretty trivial with some presets and cronjobs!
See that asterisk there - well, almost anything. The broadcast tower lights cannot be controlled via WLED, however, Brickstuff does include a preset that toggles off power, switches a relay off on the control board, and that does turn off power to the broadcast tower lights.
More notably though - the tower comes with a 5V 3A power supply, and 503 LEDs will draw much more than 3A if they’re allowed to. Simple math & physics. Brickstuff very kindly notes in numerous places not to set the brightness higher than 100 in WLED (or about 39.2% of max brightness, which is 255), and it is kind of a shame but I also get it - you probably don’t want 5A+ going into this tower just for full beans lighting effects. 3 amps is a lot safer to deal with.
WLED does have a configuration option for an automatic brightness limiter - basically you put in your max power draw (3000 mA), power draw per LED (30 mA seems to do the trick for me), and WLED will cap the brightness to the point where it tries to stay below 3 A total draw. This works pretty well and I can slam the brightness to 255 without tripping the relay - and this is handy when you want to run effects that can use the extra brightness because not all the LEDs are on.
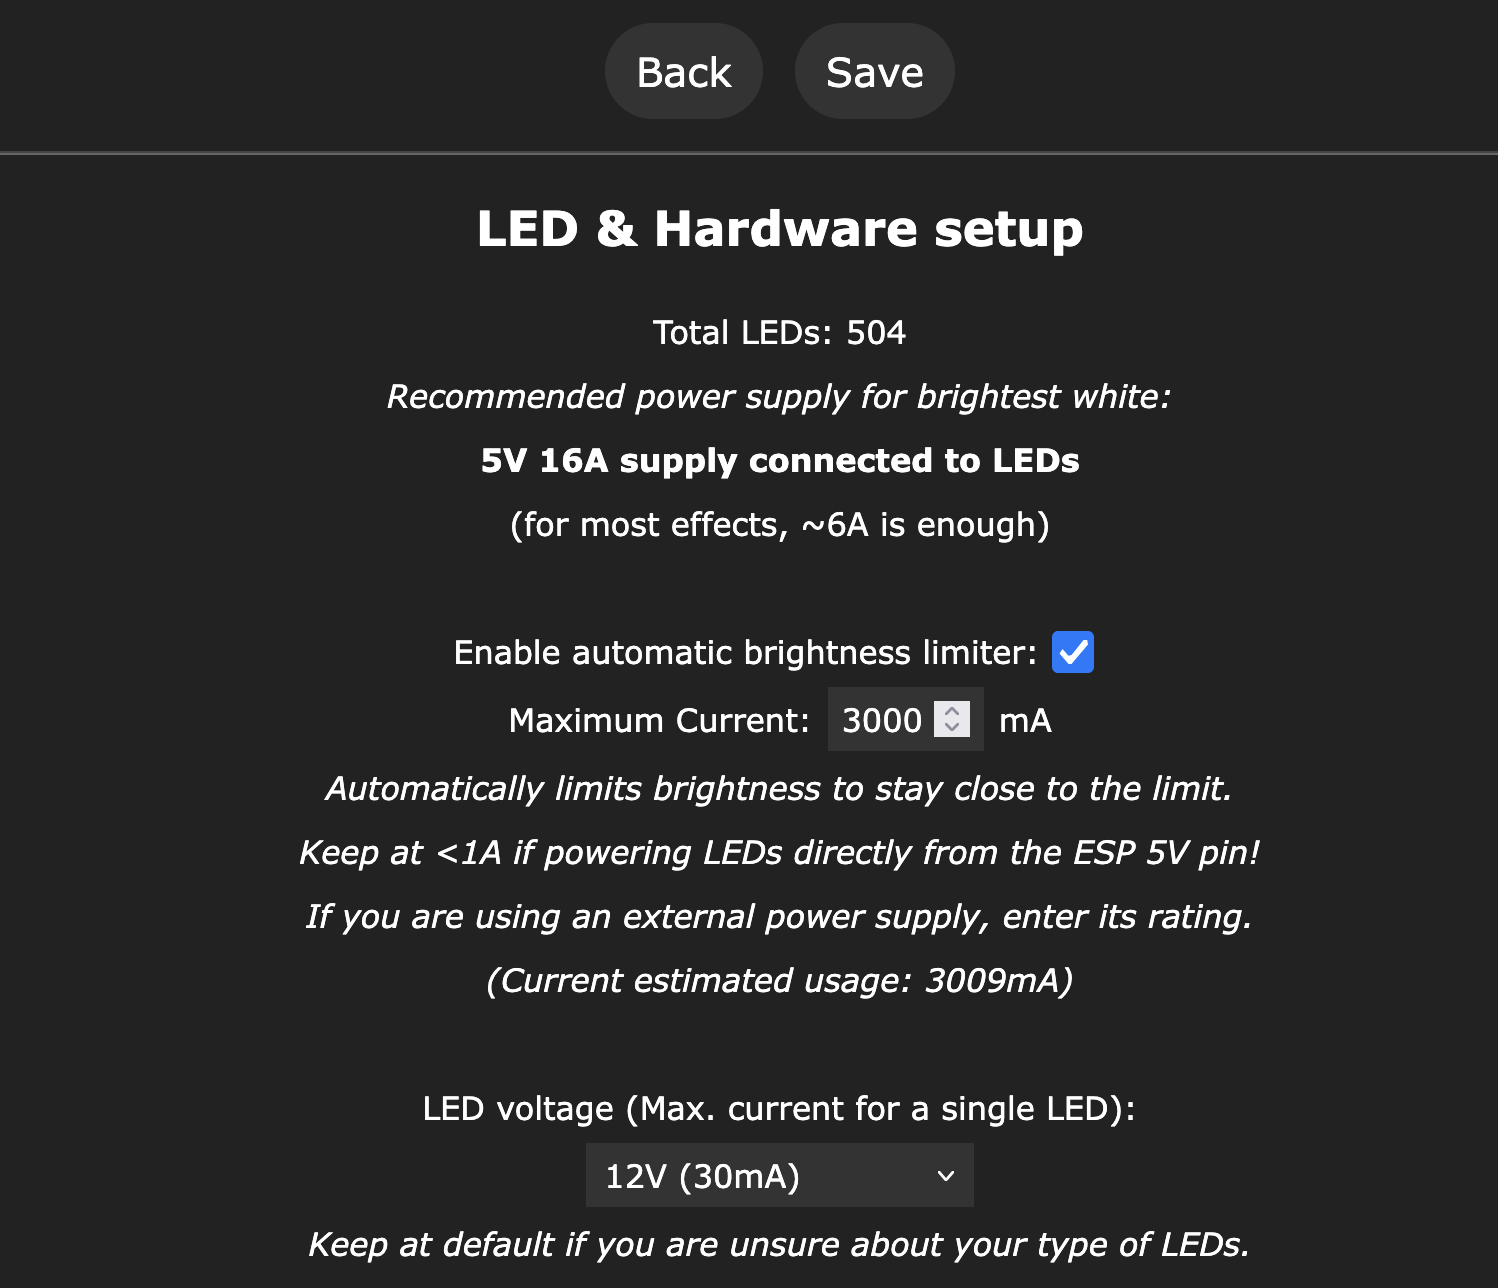
I’m honestly surprised Brickstuff doesn’t turn this on by default - and perhaps set it to 35 mA per LED for a bit of headroom - because this is very handy tool for extra safety. The relay on the tower prevents you from drawing too much current and resets the tower when doing so - but it’s always nice to avoid it. Anyway, enabling this does let you eek out a bit more brightness on the tower if you’re okay with bumping right up against the current limit. The 3009 mA figure is from a tower setting that tries to glow the tower as close to real life as possible.
Other than the little quirks and gripes I have with the tower - this is an excellent light kit, especially for people who love home automation and screwing around with smart technology. I wouldn’t recommend it to everyone, and the $500 price tag is an absolute huge thing to swallow, but it’s incredibly worth it if the Eiffel Tower is a display piece on your home/apartment/living situation/abode.