


OctoCam is a timelapse camera software stack based on the Pimoroni OctoCam hardware kit. Inspired by my love to watch weather timelapses (and to capture awesome timelapses during snowstorms), OctoCam started development in Spring 2021.
The premise is simple - take images every 20 seconds, then combine all those images to make a 2 minute, 24 second timelapse at the end of the day (in addition to partial daily timelapses created throughout the day). And, have a website to view all those timelapses and what OctoCam is seeing.
Since 2021, OctoCam has been around for 5 years - my longest project to date. It’s evolved to add new features, improve reliability, and change camera modules numerous times depending on which window it’s in. Having captured nearly 7.5 million images, translating into ~1,600 daily timelapses, OctoCam has seen almost everything imaginable - lightning storms (with strikes in the frame), rainbows, snowstorms, lunar eclipses, low-level clouds at night, plenty of bugs in view, fireworks, myself waving the camera, and even the aurora.
Despite active development ceasing in 2024 as I focused on other projects, I still maintain OctoCam actively to ensure it is working correctly. OctoCam’s reliability is almost bulletproof at this point, with consistent >99.9% uptime for months and years on end - and running for 4 months nonstop at 100% uptime.
I have no intentions of shutting OctoCam down any time soon, and will keep running OctoCam as long as I have a window to take photos out of (with a good view, of course).
—
Languages: Python, HTML, CSS, JavaScript
Frameworks: PiCamera, Flask, ffmpeg, Materialize CSS, WeatherKit API
Lines of code: ~5,000
Timeframe: March 2021 - present
—
You can visit this project at octocam.owenthe.dev.
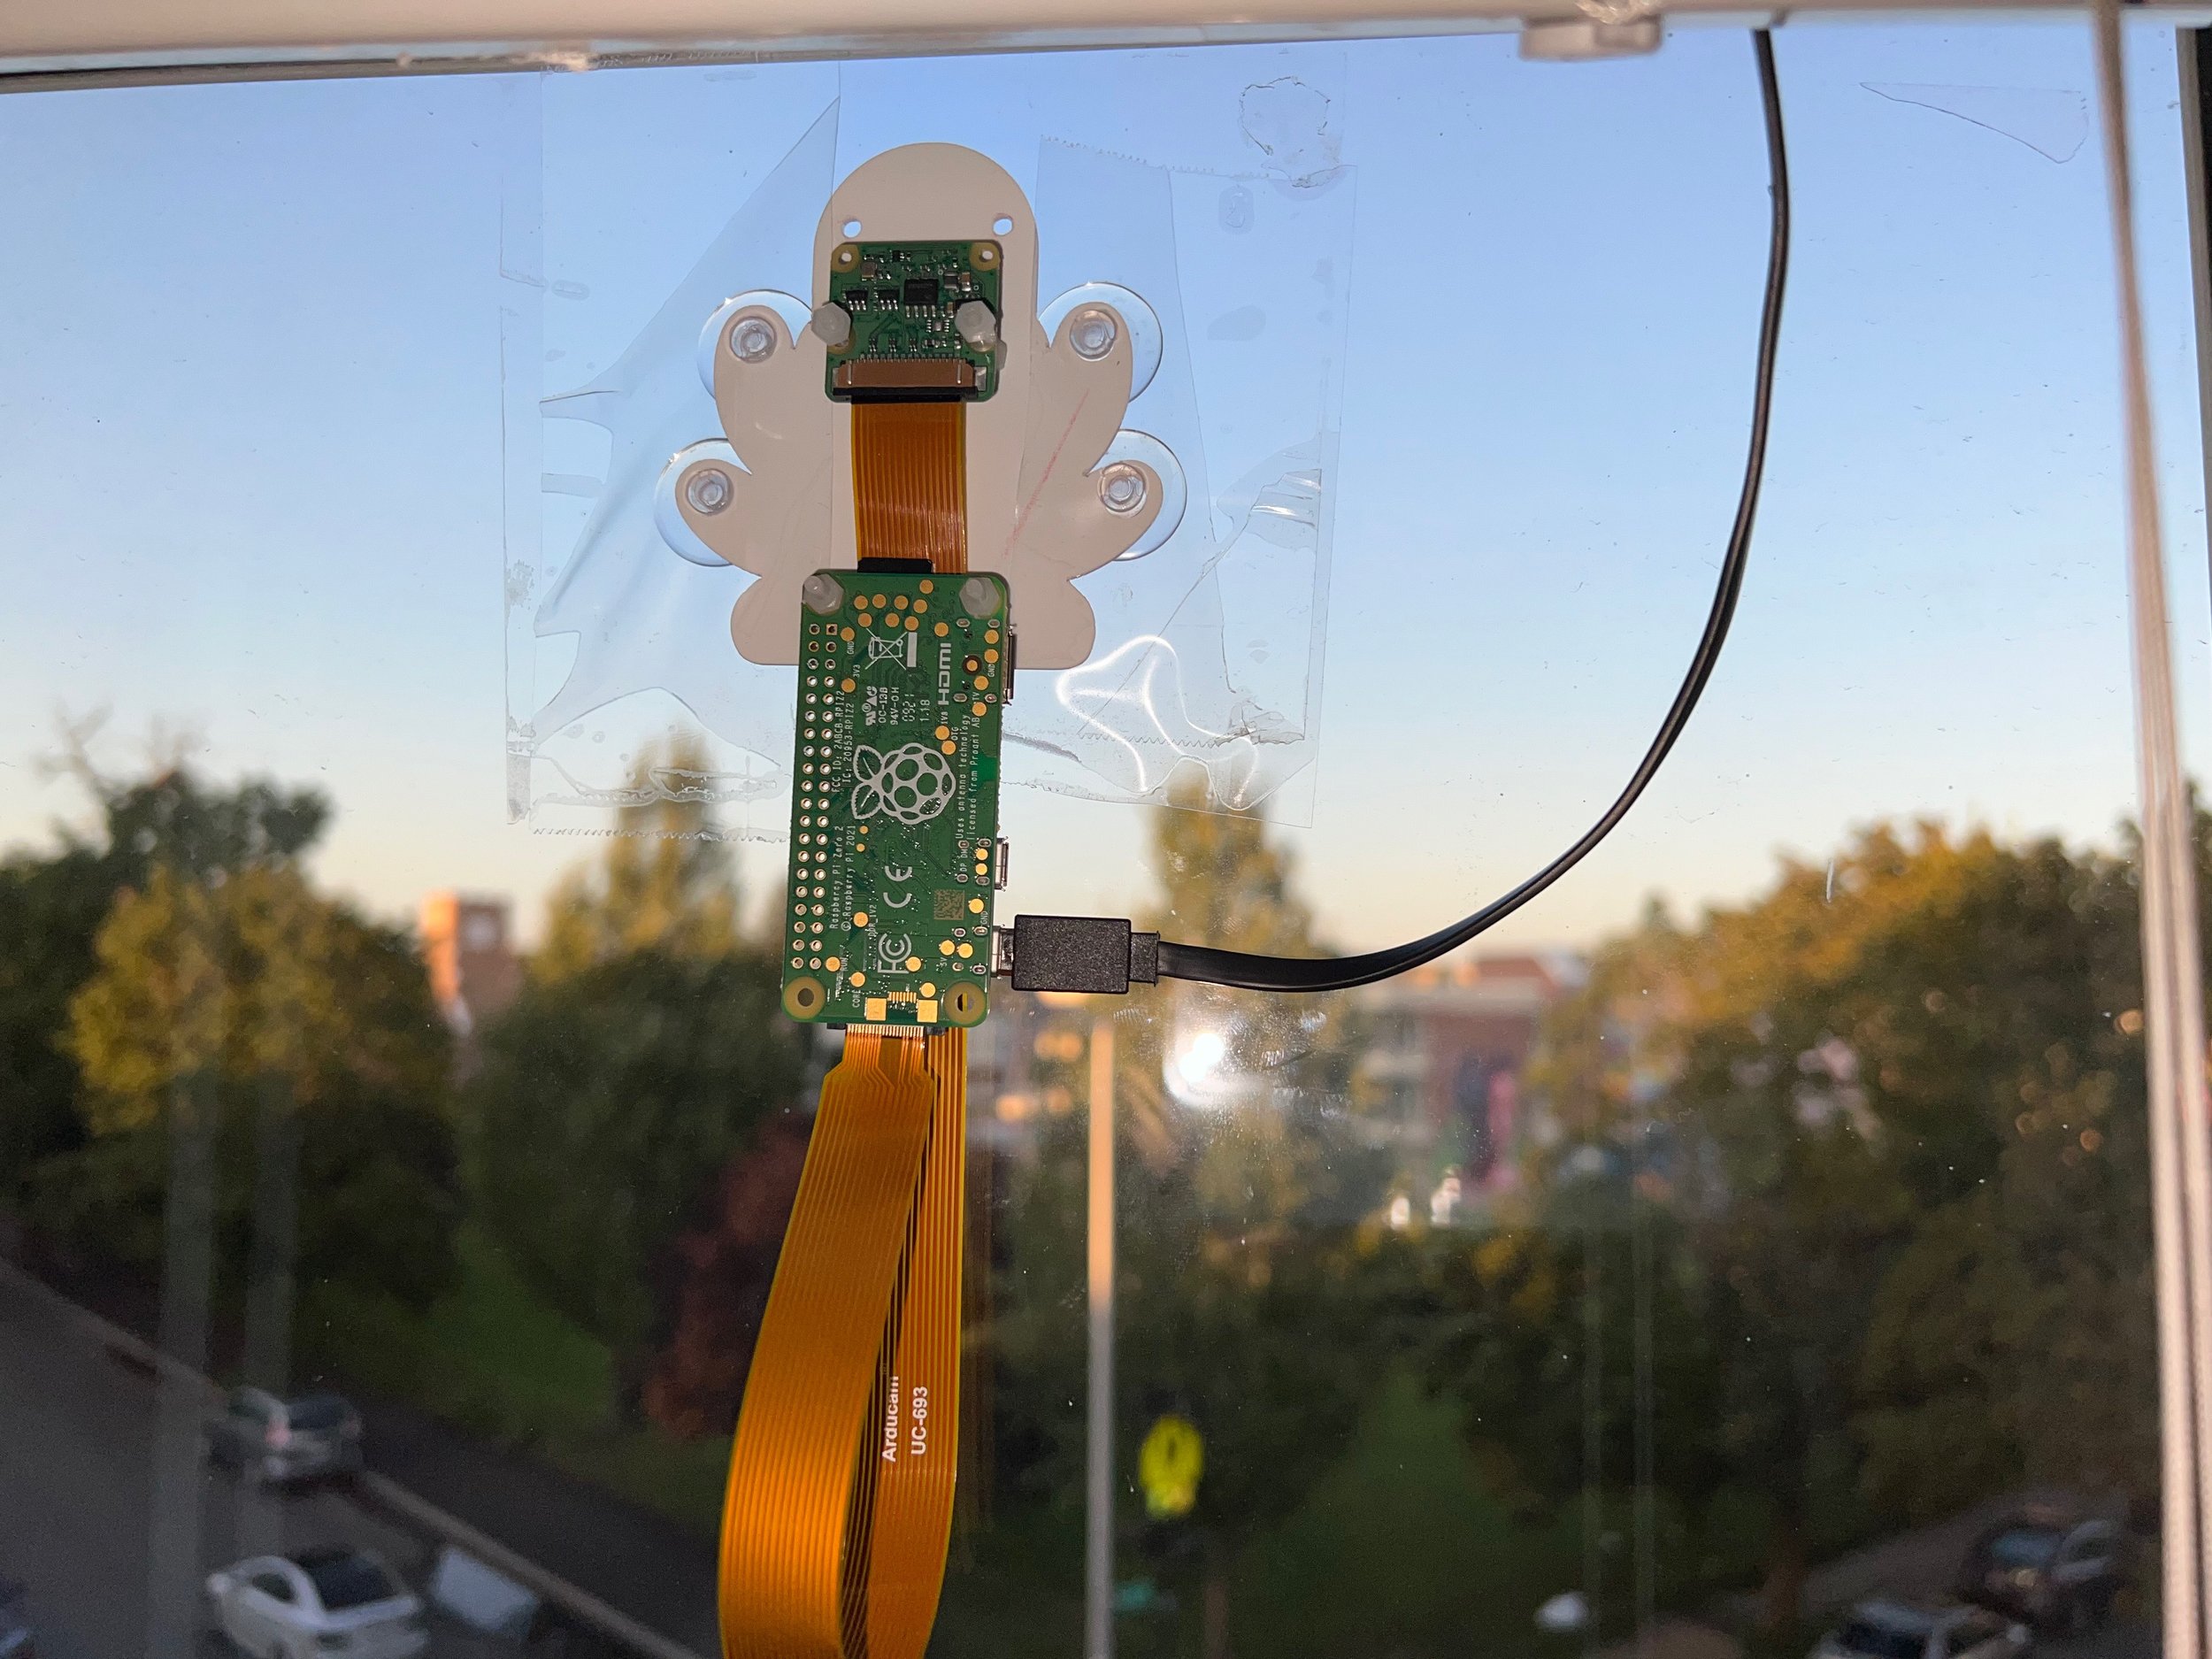
This is the hardware setup for OctoCam! The mounting plate is the work of Pimoroni’s now discontinued OctoCam project kit.
Originally, this kit came with a Pi Zero W and a OV5647 5MP (commonly known as a ZeroCam) camera with a 80 degree FoV when I got it in March 2021. But I quickly realized that better camera modules existed for my needs.
For OctoCam to capture the weather & sky, I quickly realized a wide-angle sensor was key. I installed a OV5647 sensor with a 120 degree FoV, which massively improved how much OctoCam was seeing.
In December 2021, I upgraded OctoCam to use a Pi Zero 2 W for much better processing power. This allowed me to compress & timestamp images on the Pi itself, rather than on the backend.
In January 2023, Raspberry Pi announced the Camera Module 3, which was a huge jump in camera quality on Raspberry Pis. Six months later, I took the plunge and bought the CM3 Wide, which took quite a bit of tinkering to fit the larger sensor on a mounting plate not designed for it. It worked though, albeit with having to have the Pi dangle down from the plate.
In the current iteration of OctoCam, the Pi is physically flipped 90 degrees to provide a portrait image.
For reference, this is what the hardware looked like in November 2021 before the Pi Zero 2 W upgrade. The Pi & camera are meant to nicely tuck onto the mounting plate with 4 screws to hold the PCB.
But y’know, then the Camera Module 3 happened.
Before we begin, out of all the millions of images OctoCam has captured, the images on the morning of May 11, 2024 remain some of my favorite.
On this day, an extremely strong geomagnetic storm hit the Earth and produced aurora that was visible in a lot of the Northeastern US. OctoCam captured the aurora for nearly 6.5 hours due to the existence of night mode, made even luckier by the camera pointing to the northeast to see it.
The 1 year that OctoCam captured on a CM3 Wide in Worcester are my favorite timelapses in all of OctoCam. The sky coverage was magnificent and every day genuinely produced such an interesting timelapse.
Before we get anything started here, this is in fact a photo of the aurora that OctoCam took on the morning of May 11, 2024.
OctoCam saw the aurora in Worcester for nearly six and a half hours during the strong solar storms at a 1 second exposure time in night mode (more about this as you read), made very lucky given it had a NE view of the sky in its current setup.
It's honestly incredible that OctoCam captured a very rare solar storm of this magnitude. Like, damn. Anyway back to the article!
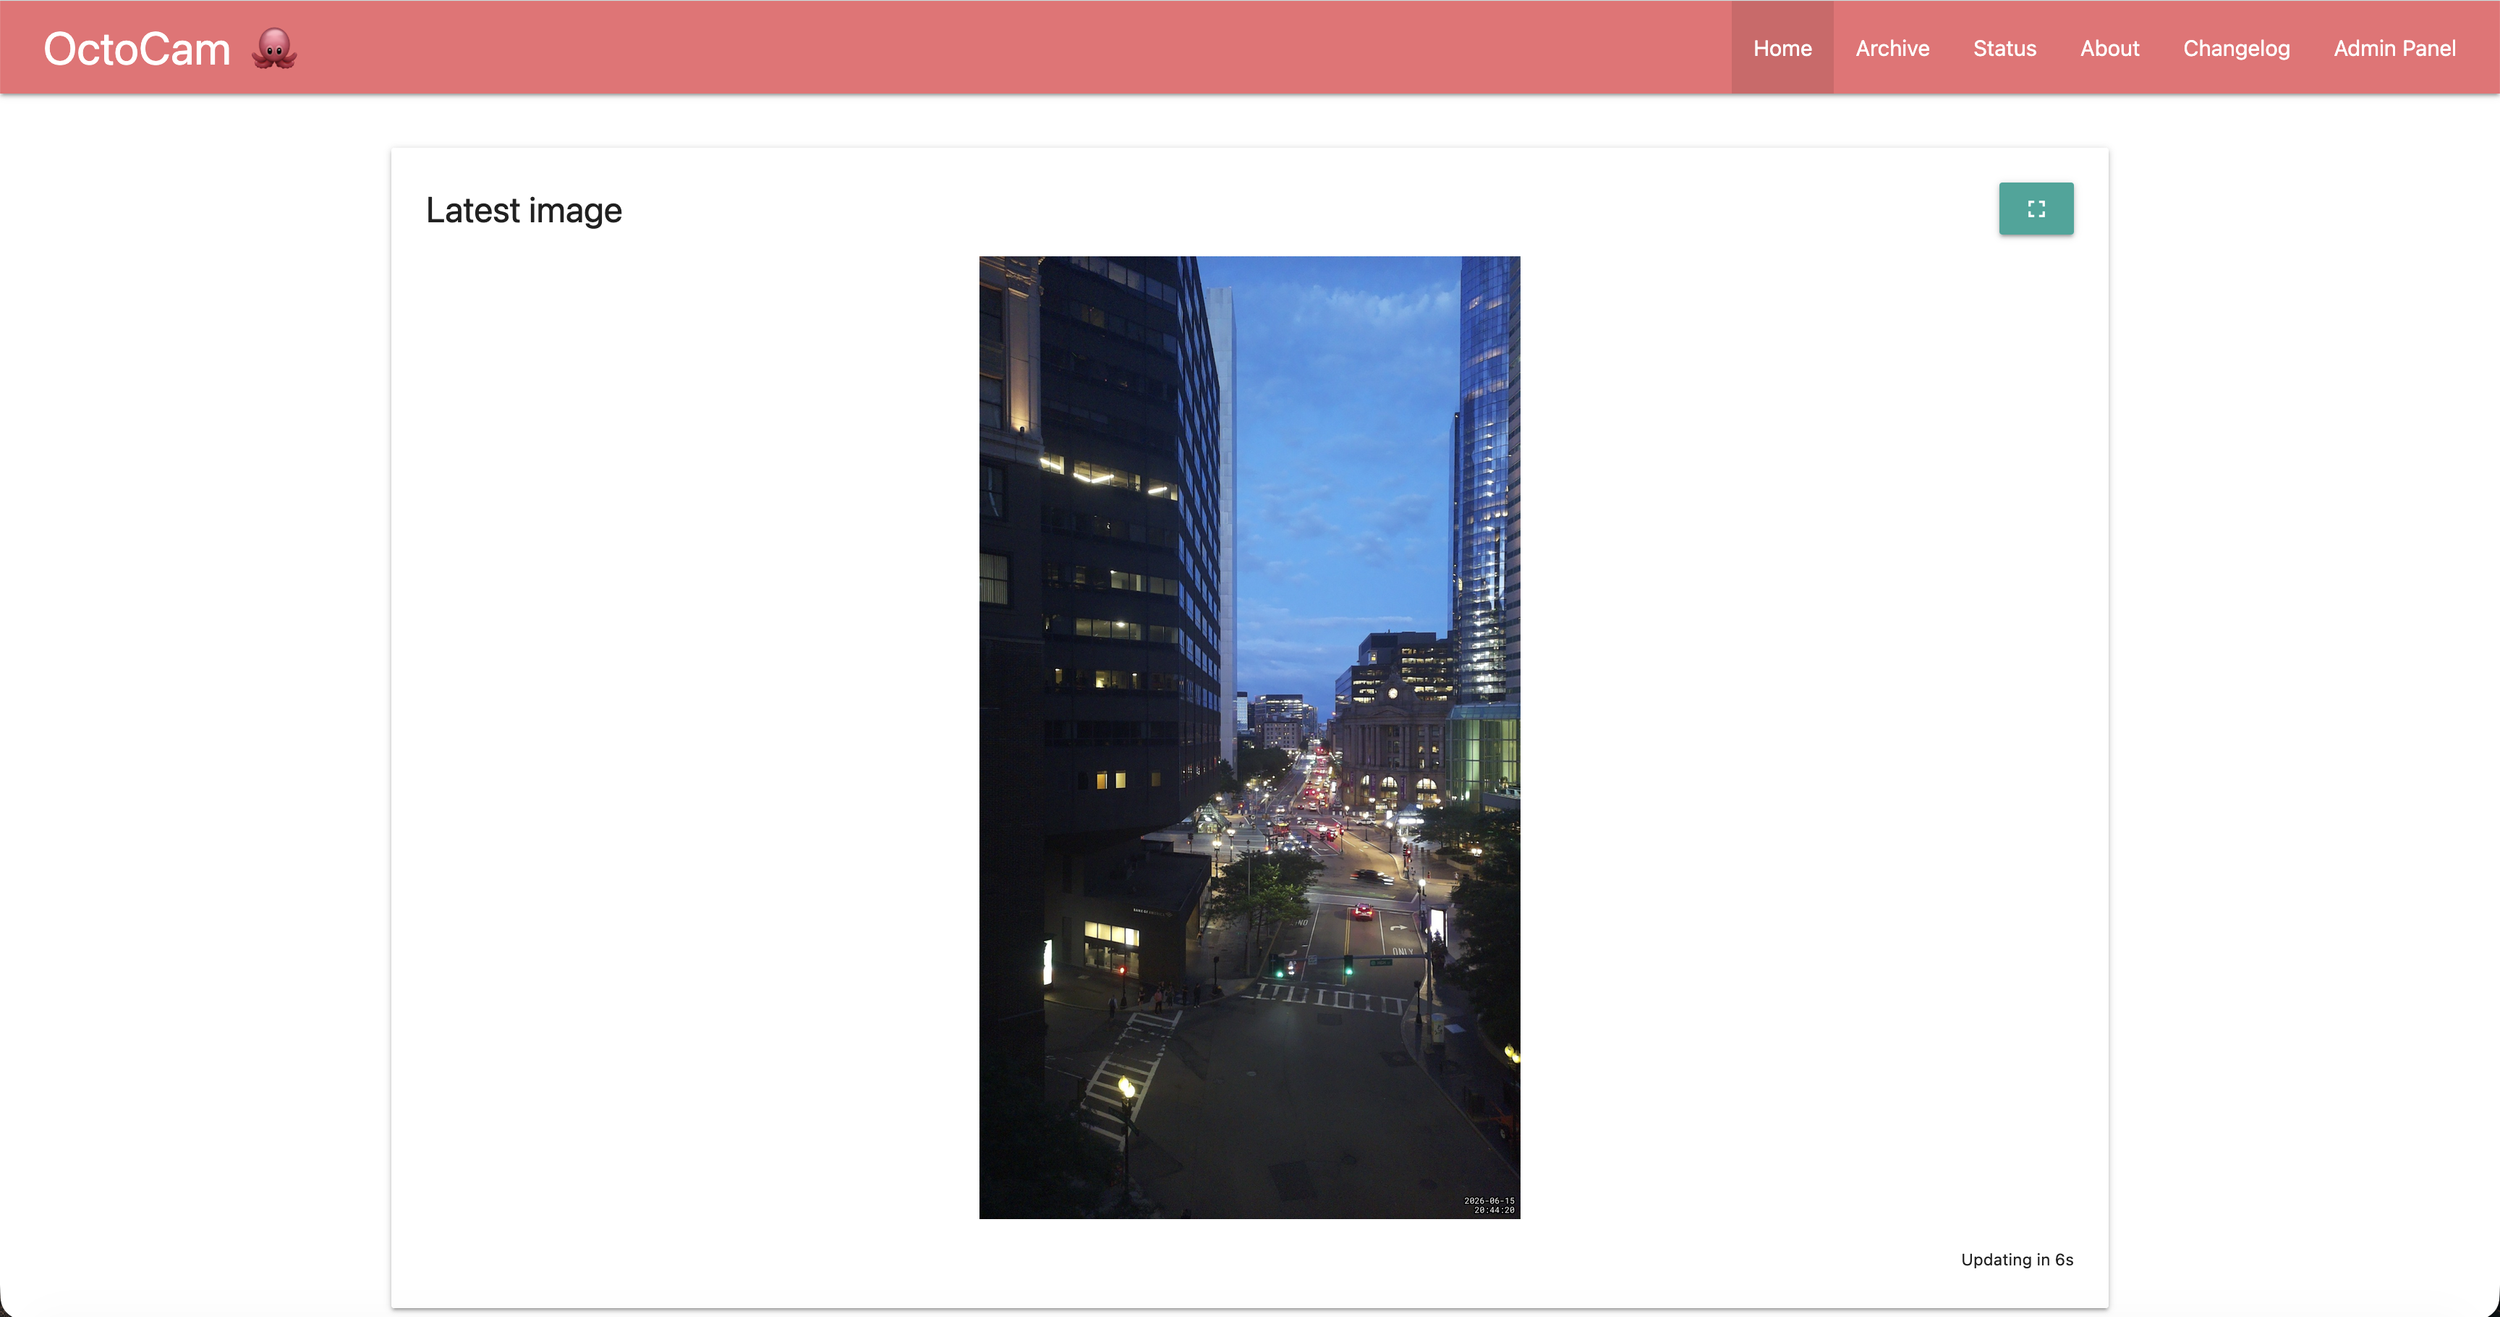
This is the OctoCam homepage! When you first visit the website, you’re greeted with the latest image that OctoCam captured, along with a navbar at the top so you can navigate all the various pages on OctoCam. The current page you’re on is highlighted.
The photos on this page were captured at various points between 2022 and 2026, although the website practically remains identical aside from some minor changes.
Due to the dense downtown location that OctoCam has been capturing at, the sensor is flipped vertically so you can see a teeny tiny patch of the sky.
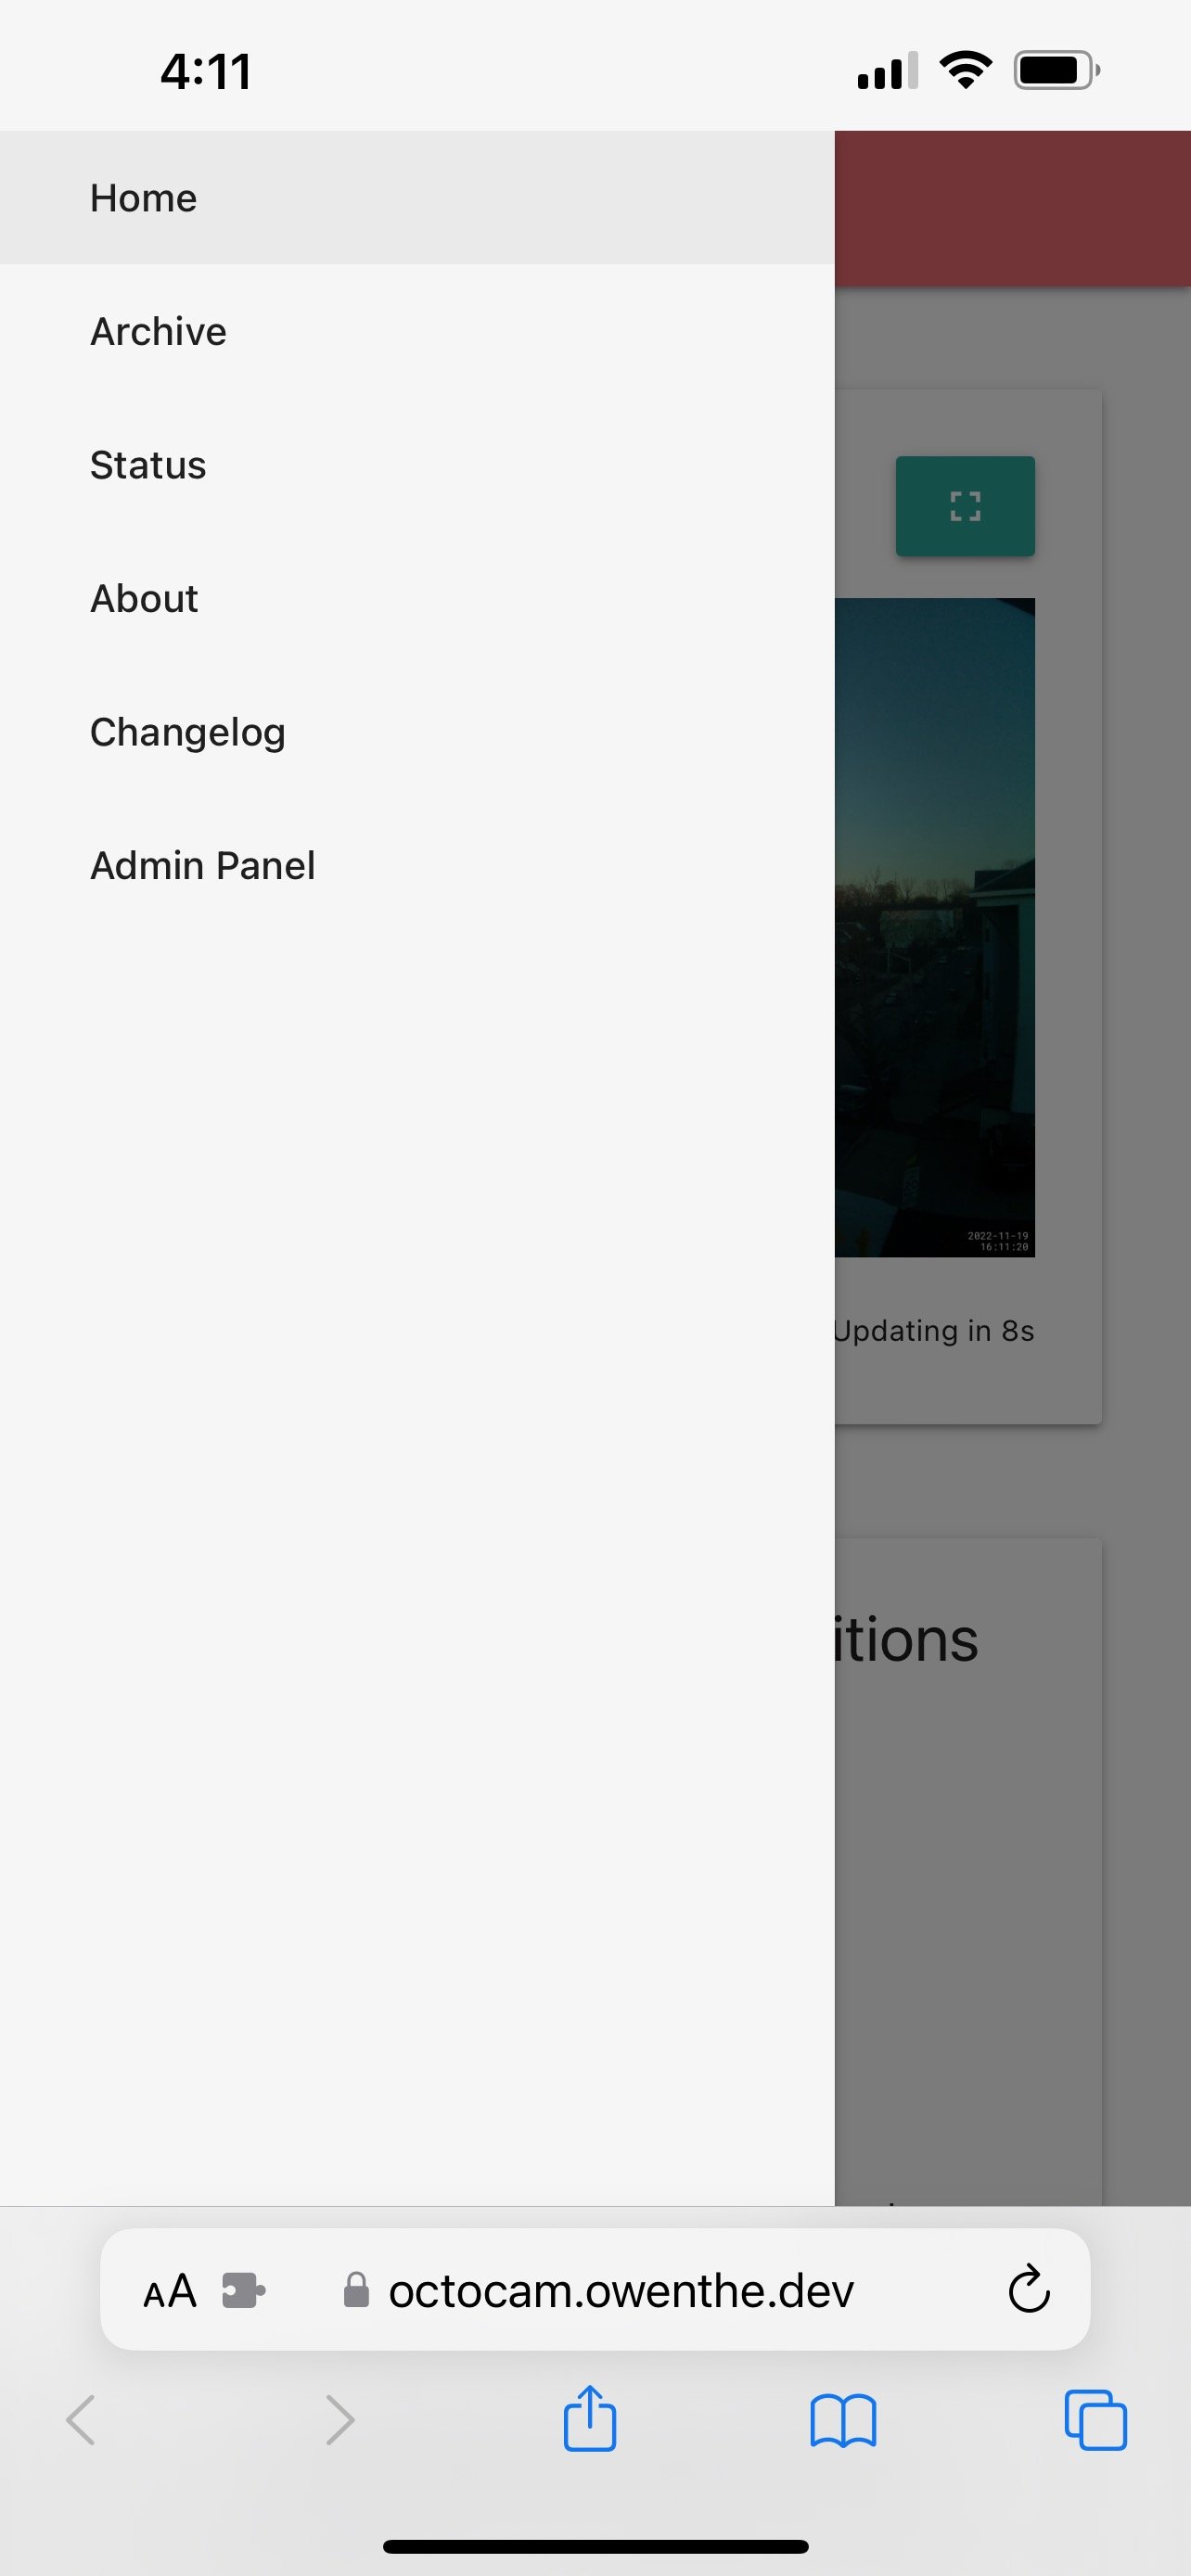
The navbar mentioned just a moment ago is also mobile friendly! It’ll collapse all the links into a sidenav that can be triggered from the navbar.
Here’s a demo of the latest image automatically refreshing, doing so every 20 seconds (as that’s how often OctoCam uploads images). Excuse Squarespace absolutely destroying the image quality here, but hopefully you get the idea.
OctoCam’s auto-refresh system is quite built up, as when the camera was in Worcester, I was able to crank the exposure up to almost 1-2 seconds at night to get low-level clouds. This increased capture latency to the point where auto-refresh had to know if the camera was either in a transition night mode or a full night mode.
Since OctoCam now points at South Station, night mode increases the exposure time by ~75ms, so the same auto-refresh time is used.
Below the latest image card, there’s another card that displays the current weather conditions at OctoCam’s locations. The conditions are fetched every 5 minutes on the backend, then distributed down to clients to save on WeatherKit API calls.
As mentioned a moment ago, OctoCam has a concept of night mode, which would crank up the exposure for better captures at night. The weather conditions box shows you when night mode is coming on and off, using pre-determined intervals.
In addition to the manual intervals, OctoCam checks before sunrise & sunset what the current cloud cover is. If it’s high enough, it’ll delay entering/exiting night mode by 10 minutes, since on a cloudy day, less light is entering the camera sensor and an early entry/exit produces a jarring exposure change on the timelapse video.
This decision is reported to the frontend, which is used on the weather conditions card & timelapse card to inform you about the status of night mode for the day.
As with everything on the client page, the weather automatically refreshes as well at the appropriate time. Since the weather data is only a dozen or so KB and doesn’t require a lot of special processing, the oh so slick UI is quickly hidden.
Below the weather box, you’ll find a quick blurb about OctoCam, then the meat and potatoes of OctoCam, the timelapses!
The timelapse library on the homepage shows the last 30 days of full-day timelapses, in addition to a partial day timelapse. Partial day timelapses are generated every 3 hours (at 3 AM, 6 AM, etc) and show the daily timelapse progress up to the point of rendering. It’s a cool way of seeing the day so far without needing to wait for the full-day timelapse to come out. The 3-hour interval was chosen as a nice compromise of semi-frequent refreshes without having to hammer the backend too often with render requests (and subsequently drive up my electric bill).
In the library, each timelapse shows a quick weather summary, and the duration/FPS of the timelapse.
The weather summary use to come straight from the Dark Sky API and was pretty good at summarizing what happened during the day. But now that Dark Sky has bit the dust, a weather summary is generated from WeatherKit using my internal WeatherKitProvider library and it gets…close enough to what Dark Sky would generate.
Similar to the image auto-refresh, the timelapse library also auto-refreshes! A quick disclaimer, this is a manually triggered refresh after I generated a timelapse for this demo. In short, the timelapse library auto-refreshes at pre-defined timings when a new timelapse should be available.
But just like before, implementing this wasn’t so simple! While timelapses do get generated at regular 3-hour (10800 second) intervals, there’s a couple key things to consider.
First - there’s an encoding/upload delay between a request getting made and the timelapse showing up here. Usually this delay maxes out at 4 minutes. But that’s not too hard to implement - just auto refresh at 12:04 AM, 3:04 AM, etc.
You then quickly realize that it’s a bit mathematically tricky to mathematically get the next one of these 3 hour intervals! Let me explain.
To get the next refresh time for current conditions (for example), what I do is take the current UNIX time, divide it by 300 (the refresh interval in seconds), then multiply it back by 300 to get a floored number, before adding 5 seconds to account for server delay. I do this flooring because of the delay. For example, if it’s 3:05:01 PM, this flooring gets me 3:05:00 PM + 5s = 3:05:05 PM so we can auto-refresh correctly at 3:05:05 PM. And if this floored + corrected time is below the current time (e.g. it’s 3:07:30 PM), then I add another 300 seconds to the next refresh time (to get 3:10:05 PM).
The problem is when you go over 3600 seconds, this flooring/multiplying starts to occur as it applies to UTC+0! For instance, dividing by 10800, then multiplying by 10800 for a 3 hour interval gets you the nearest 12 AM/3 AM/6 AM in UTC+0…but not in Eastern Time which is where myself (and the backend server) live.
To complicate things, Eastern Time shifts twice a year! Our UTC offset goes from 14,400 seconds to 18,800 seconds, then back to 14,400 seconds.
Ultimately, what you have to do is get the current UNIX time, then get the current UTC offset in America/New_York (which you CAN do in JavaScript, but it’s a hacky mess using toLocaleString and breaks twice a year but there’s no better way that doesn’t add luxon/moment), then offset the UNIX timestamp by the UTC offset (so now you’re working with the UTC timestamp like it’s in Eastern Time), do all the flooring and multiplying, then add back the offset to get the proper UNIX time, and then you add the delay. Easy peasy right?
And that’s a quick behind the scenes of some of the crazy auto-refresh systems in OctoCam. Good UX doesn’t come cheap!
Anyway, where were we…
Ah yes, the timelapse library. Clicking on a timelapse expands the timelapse showing the video element, and some weather details about the timelapse.
The timelapse thumbnail is blank because HTML5’s video tag does thumbnail rendering in the most uninnovative way ever: just fetch the whole video! Ask me how I know, this happened wayyyy back when the OctoCam web stack was being made and my client was pushing 200 Mbps of video data to prefetch videos for a thumbnail.
Anyway, below the video is the weather for the day of the timelapse. You get the condition summary, high and low temperature, and oodles of weather data because not-so-secretly I am a weather nerd. The night mode timings are also included, and you can see the early night mode feature in action here! A log of when OctoCam does this early/late night mode stuff is logged for the library.
Below that is the download button. No magic there, it just downloads.
Now you might be wondering, where do timelapses go that are older than 30 days? The answer is the archive!
When OctoCam first started, I was pretty cautious about the privacy implications of OctoCam and had a very strict purging policy. The tides changed a month or two in though - every day that OctoCam captures is unique, so why delete old videos?
Starting in September 2021, I officially had the policy of never deleting timelapse videos, and backfilled timelapse videos from my laptop to March 2021.
On the homepage you can see the current count of timelapses, the timelapse from a year ago, and then all the videos in the archive.
A super cool feature in the archive is the on this day one year ago box which shows the timelapse OctoCam captured from a year ago (if available). Of course implementing this feature wasn’t super easy due to our good ol friend time. Let me explain.
For a bit of context, OctoCam timelapse videos literally embed information into the filename itself, in the format of <UNIX timestamp of the end of the timelapse>_<seconds the timelapse covers>.mp4. For instance, a full day timelapse covering November 17, 2022 is named 1668747600_86400.mp4.
My first idea with this feature was, oh cool, let me just do the whole flooring and multiplying thing at 86400 seconds, subtract 31536000 seconds (365 days), and then if a timelapse with that timestamp and _86400.mp4 exist, we’ve got ourselves a winner!
And then reality hit. Reality always hits. Not only do we have to contend with daylight savings time, leap year is also a thing.
Thankfully, Python makes it relatively easy with third-party libraries to find the UNIX timestamp for midnight of a certain day (this is how full-day timelapse generation avoids issues with DST), and figure out the UNIX timestamp that happened a year ago that factors in leap years and time changes.
Hopefully this feature won’t break on February 29, 2024…
And below that is the actual meat and potatoes, the archived timelapses.
Pagination had to be added in September 2022 because ~400 videos were crashing WebKit’s rendering engine. Each page has 50 videos, and back in 2022, there were 5 pages in the archive (and pagination might’ve been set to 100 iirc). Anyway, now it’s lower and the archive is 37 pages long. How times have passed!
Anyways, the archive library shows all the same detail as the normal timelapse library, with weather conditions for every timelapse. When clicking on a timelapse, the UI is exactly the same as on the frontend with detailed weather conditions and a download button.
The archive use to go deep. So deep that you could uncover videos of OctoCam on the 80 degree FoV, and even a timelapse from MotionEye OS.
However, that’s a LOT of video. Only so many videos can fit on my web server before it…runs out of storage. So, in 2023, I made a solution: long-term storage.
In short: videos that are 1 year or newer live on my Web VPS. This covers ~40-50 GB of video that can be easily fetched with high bandwidth. Videos that are older than that live on a server in my apartment with much, much more storage. Even with a decent upload speed, the video still needs to get pulled from the Nginx reverse proxy at my apartment, then up to the OctoCam website. This takes a bit, so videos tend to buffer a bit, and the VPS ends up having to send the entire video response to the client. But, this means you can access every single OctoCam video in a sustainable way.
And thankfully I have a lot of old laptop hard drives…so that’s a good thing with the AI boom making SSD prices absolutely insane.
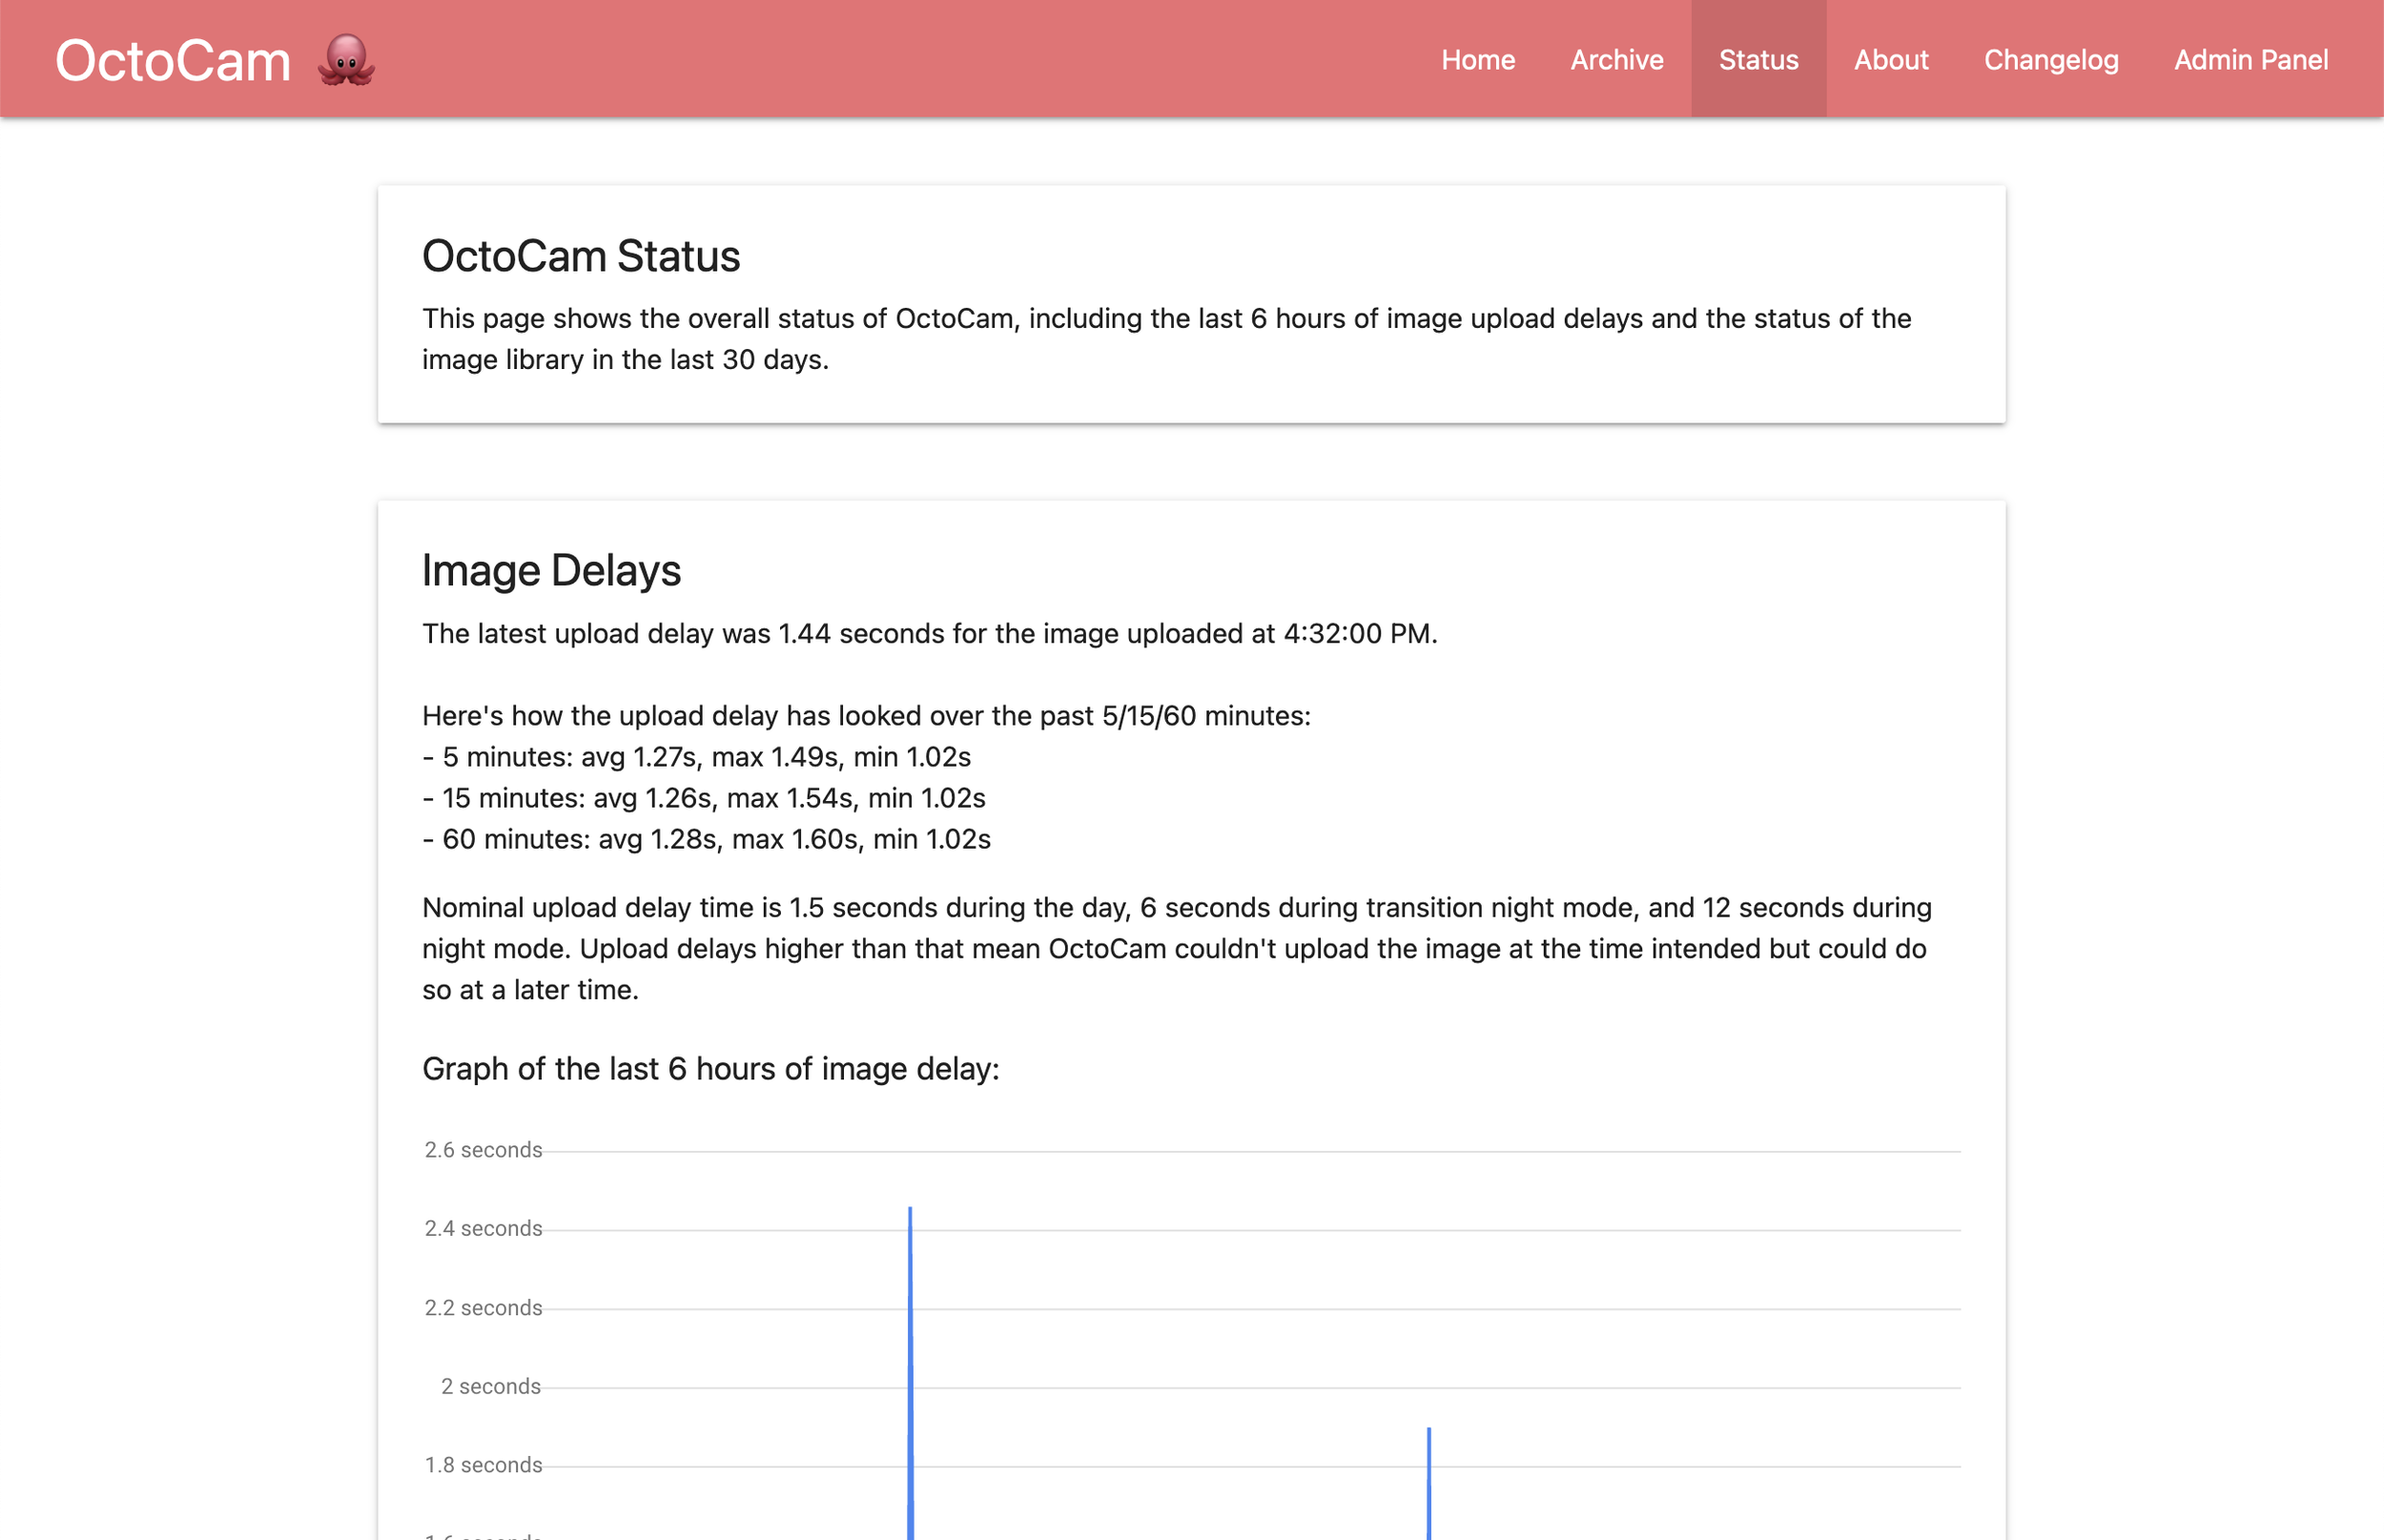
Moving on, let’s take a look at the OctoCam status page! This page was mostly made for me to keep an eye on OctoCam’s operations, but there’s some cool things going on here.
First and foremost is the OctoCam image delay metrics. As mentioned earlier, depending on the time of day images will come down to the backend with a differing amount of delay.
The image delay graph was actually born out of a time when my university network was acting up for a few days, producing persistent packet drops, which then made OctoCam have the tendancy to successfully upload images about 1/2 of the time. Of course I was wondering what on earth was going on and made a graph to further understand things.
(these packet drops also borked an entire timelapse because the request to get sunrise/sunset data for night mode intervals failed! and OctoCam stayed in night mode all day long…protections are now in place to avoid this.)
Nowadays, it’s a chill graph and I can monitor for any network anomalies that may occur. There’s also some 5/15/60 minute delay metrics inspired by load average metrics on Linux.
This box also auto-refreshes like the many other boxes on the website. No advanced system here, just refreshing every 60 seconds with about 15 seconds of delay to account for night mode.
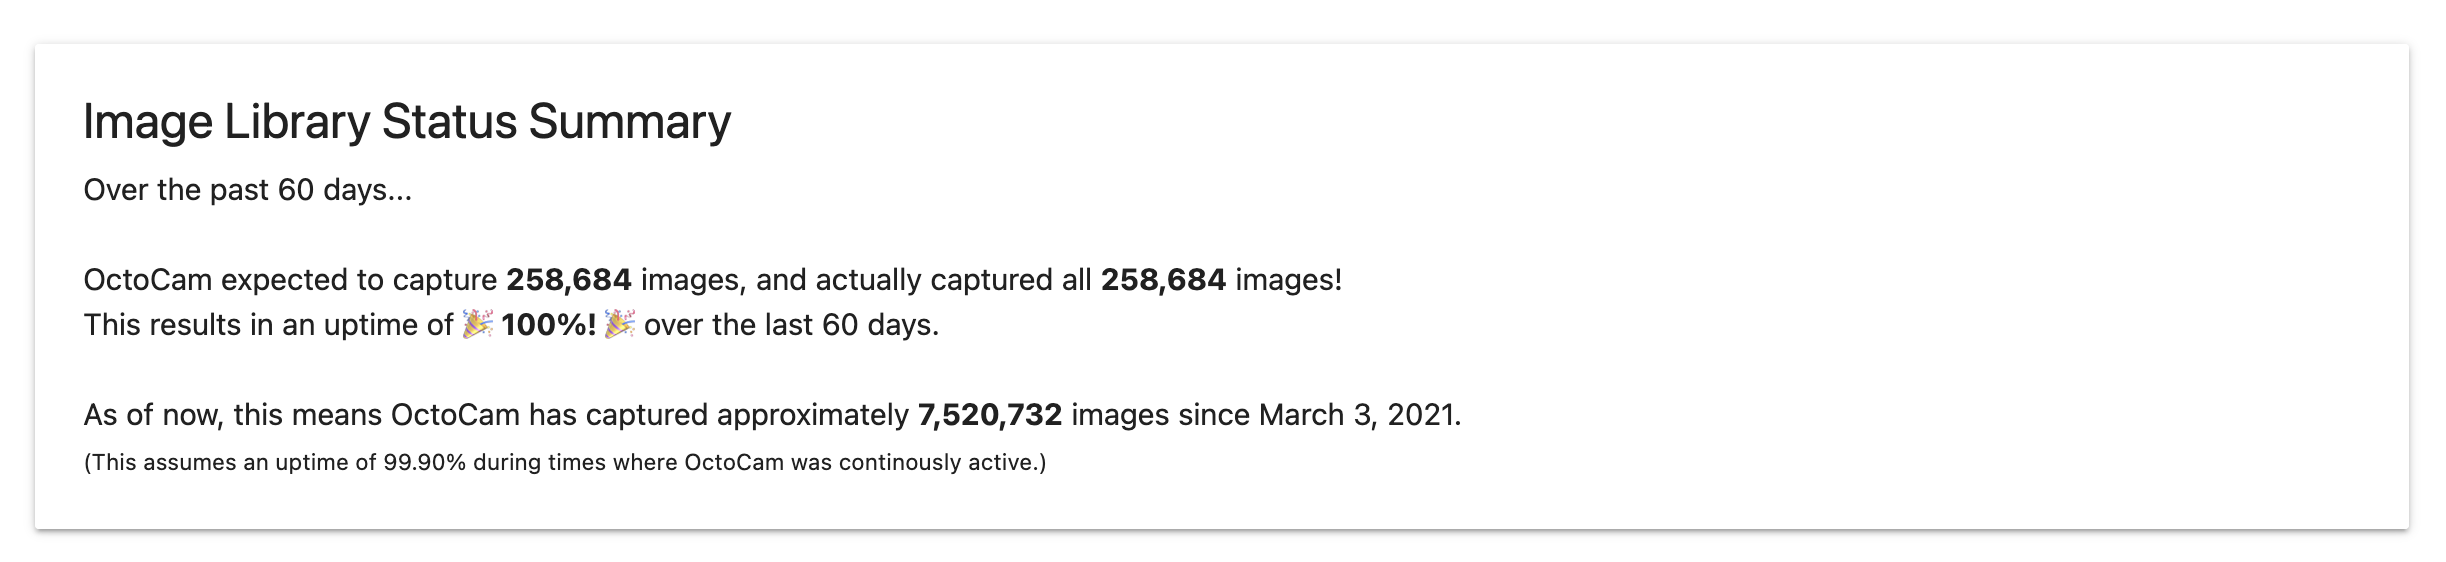
Below that, you’ll find the image library status summary, which does exactly what it says. It summarizes the status of the images OctoCam has been capturing over the last 60 days!
And yes, OctoCam really does capture that many images in 2 months, and yes, it does reach 100% uptime for at least a few months a year. Downtime usually happens due to network corruption issues or physical issues with the camera. I hope to implement a negative ACK system at some point to bridge the final gap in OctoCam reliability.
Below that, you’ll find the details of OctoCam’s missing images in the last 60 days. Even though OctoCam is very reliable (and usually has image uptime in excess of 99.9% almost all the time), sometimes there are hiccups that aren’t a result of hardware maintenance.
This is where this section comes in handy, as it shows when images weren’t captured for each day. At a high-level overview, you can see each day, how many images were captured versus expected, and a daily uptime percent. Status icons indicate an overall status for the day (green = 100%, yellow >= 99%, red < 99%)
Now you may think this is easy to calculate, because OctoCam images so handily have the UNIX timestamp they were captured at as their filename. Just see if they exist, right? Sort of.
See, Python isn’t exactly the fastest language (even Python 3.11 won’t help here), and looping through 260,000 image names 30 times to calculate each day status isn’t fast. This is what I did for a while, and it led to the status page taking 10-15 seconds to load. Instead, multithreading is now used so that each day’s status is calculated by its own worker, and that worker checks if every one of 4320 expected images exist (or not). As a result, the status page loads much faster.
For a day when an outage occurs, clicking on it will immediately give you details to the statement “Bono, my images are gone!”.
The details show exactly when an outage starts, gets resolved, and how long (in terms of the timelapse) each outage lasted for.
To try and automatically resolve any camera-related issues resulting in image downtime, OctoCam has built-in systems to detect when these issues happen and automatically issue reboots.
In short, OctoCam from time to time experiences MMAL errors, which occurs when the camera is being used by another process and can’t capture an image, or the camera connection wasn’t closed properly.
Since the OctoCam script gets started every time an image is captured (to the tune of ~130,000 times a month), this does happen occasionally, meaning newer capture scripts can’t use the camera connection.
If the capture script detects one of these issues, it automatically sends an issue to my GitLab server, which then pings my private service monitoring Slack. This image shows an example of the auto-generated issue.
If the capture script detects that three of these issues occurred in the last 60 seconds (usually persistent MMAL issues that result in long periods of image capture fails manifest this way), then OctoCam sends another issue report to GitLab saying it’s gonna reboot, reboots, then comes back online to hopefully no more camera errors. There’s bootloop protection in place to make sure OctoCam can’t immediately bootloop after starting up.
Additionally, the backend server is always checking to ensure that new images are being uploaded. If the backend goes 5 minutes without getting a new image - another issue is posted. This is usually to catch hardware issues that require intervention and avoid huge swaths of downtime. These alerts are pretty rare - most of the time it’s due to the Pi’s Wi-Fi connection being a bit finicky (and having to reboot it & the AP), or at least once, the Pi going down so hard that MMAL issues were only getting reported en masse after many hours of the system being stuck.
In short, these notifications are to keep me aware of OctoCam’s operational status, and to intervene when necessary. It’s also what maintains the 99.9+% uptime OctoCam (usually) has, barring any larger issues that require extensive downtime.
The next page up is the changelog page, which has the big changelog of all the things changed in OctoCam. As you can see, there’s been quite a lot of changes.
And last but not least, the admin panel. Now, the admin panel got a lot more use in ye olden days when a lot of OctoCam’s content wasn’t public. As I’ve been making OctoCam’s content public, the admin panel doesn’t get used a lot.
However, there are two use cases (plus some cool technical talk about how timelapses are generated) that the admin panel has.
If you’ve made it this far in the article, take a moment to get some water!
The two functions mentioned earlier are manually generating timelapses, and to manage timelapses on the website.
The saved tab is a relic from when OctoCam was first introduced, and at this point only includes timelapses I manually generate for myself. The tab highlighted is the public page tab, and this is where I can manage timelapses on the public page. This is useful if one of the automatic timelapses had something wrong with it, and I needed to delete it before manually generating a new one.
For each timelapse, there’s buttons to download and delete the timelapse - delete being the key function here. As mentioned before, sometimes the automatic timelapses don’t come out right and I need to delete them.
You’ll notice that weather data is not included on the admin panel. It’s mostly because it’s not really needed, and rendering that data would only increase page load times.
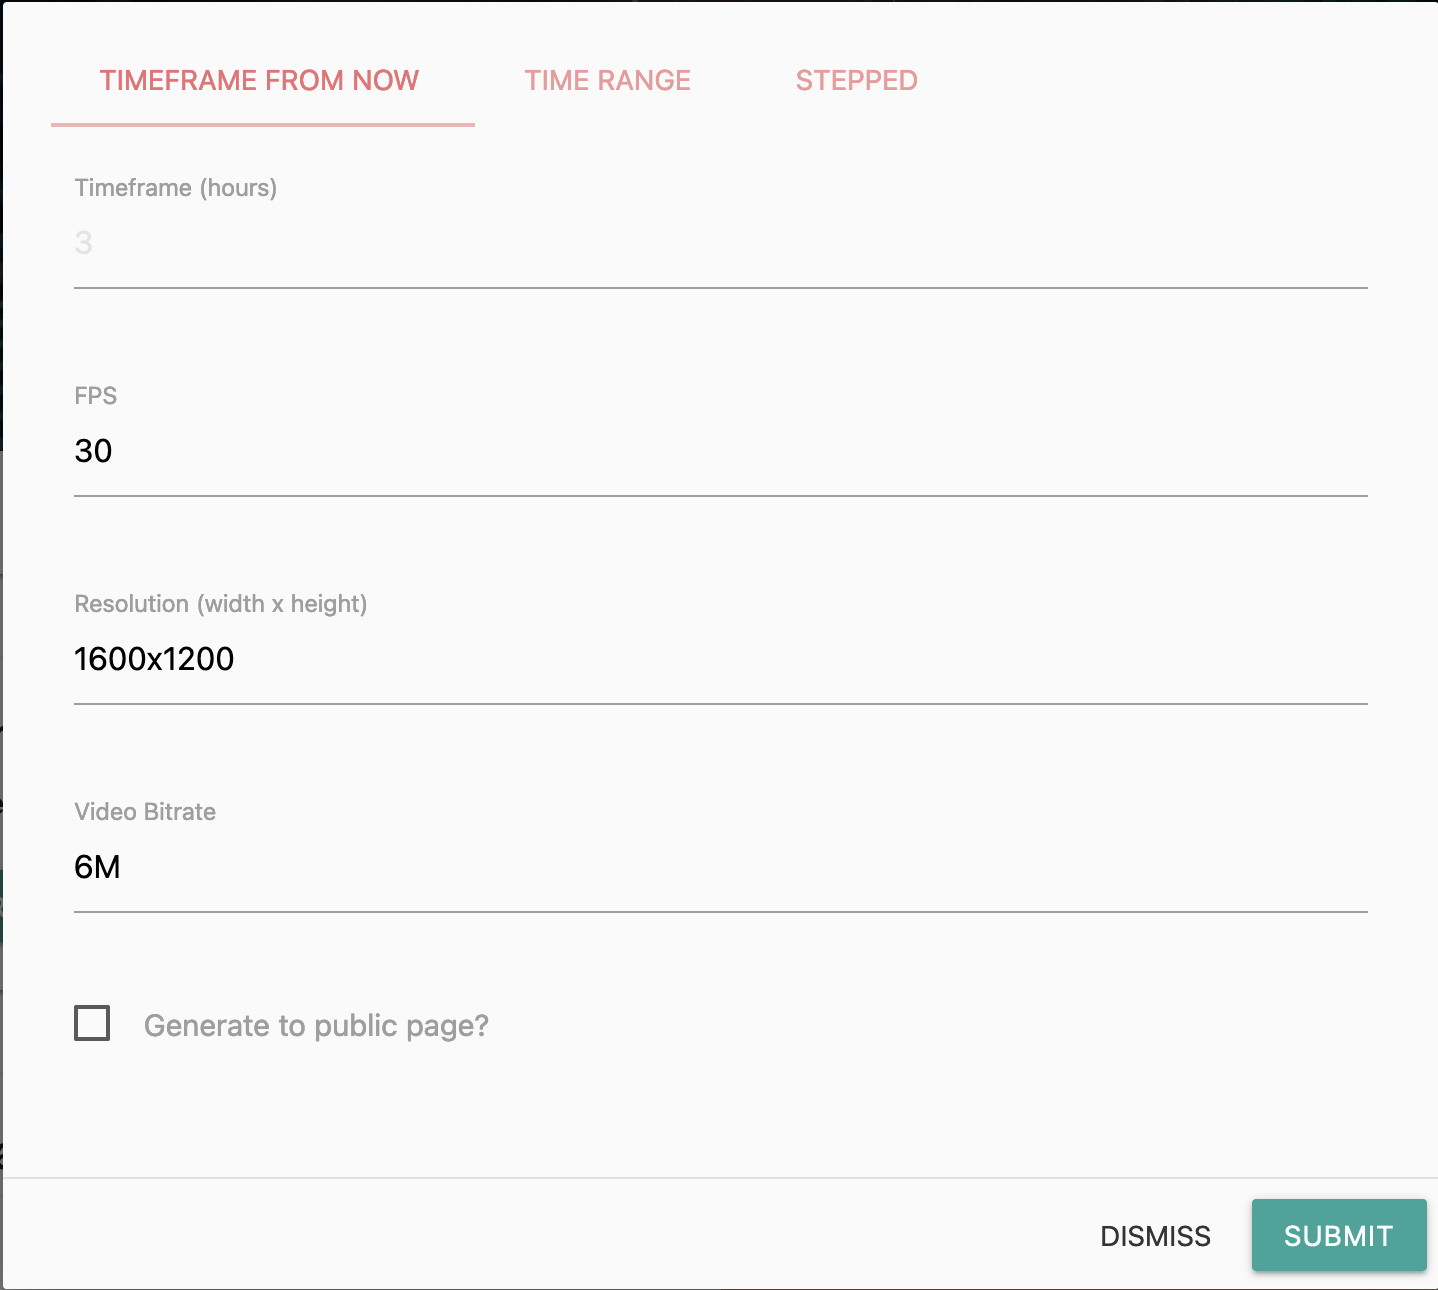
Clicking on that generate timelapse button throws you into this cool modal and with that, it’s time to bore you about OctoCam’s timelapse making abilities!
OctoCam has three distinct timelapse generation modes - timeframe from now, time ranged, and stepped. We’ll talk about all three of them in subsequent images.
Timeframe from now is the simpliest mode - you plug in a number of hours to go out from now and OctoCam generates a timelapse doing exactly that.
For each timelapse generated, you can tweak the FPS, resolution (1600x1200 is the resolution images are captured at), and the video bitrate (defaults to 6 Mbps). Defaults are pre-filled, and usually I only change the FPS setting for faster/slower timelapses.
At the bottom of each timelapse generation form is a box you can tick to generate the timelapse to the public page. It comes in handy for when I need to manually generate timelapses for the public page if an automatic process broke down, or for showing something cool on the public page.
The next and more frequently used mode is time range. In this mode, you plug in a start time and end time (UNIX timestamps on the backend), and make a timelapse using images from this range.
This is how daily timelapses are made, except it’s an automatic call using the midnight timestamps for the current day and the previous day (to account for daylight savings time as mentioned earlier).
The same FPS/resolution/bitrate settings are all present here.
As an exclusive to the time range format, there’s an extra checkbox called “Mark as a public partial timelapse”.
In short - partial timelapses are normal timelapses with partial_ added to the start of the filename, allowing them to get specially marked in the timelapse library with a special icon.
Most importantly, when partial timelapses are auto-generated every 3 hours, any timelapse with the partial_ prefix in the filename gets deleted so the next partial timelapse can replace it.
The final timelapse mode is stepped timelapse. While OctoCam timelapses are a good length for one day (2 minutes and 24 seconds to be exact), scale that up to a longer time frame and you’ve just found yourself a feature film…
(it’s no joke, but the OctoCam archive has a link to a 8 hour, 21 minute video of basically 8 months of timelapses from my sophomore year dorm!)
To solve this problem, the stepped timelapse mode was made to get really long form timelapses capturing weeks or months while maintaining reasonable video lengths. It achieves this by skipping over a large majority of images in defined configurable steps, be it 1 minute, 10 minutes, 60 minutes, etc.
This mode is used at the start of every month, when a stepped timelapse with 10 minute intervals is made to cover the last month in 2 minutes and 29 seconds. It’s super cool! Special formatting is also applied in the library to show a different icon, and metadata about the step length.
To finish off the article, here’s a flowchart of OctoCam’s backend system as of 2022. For the most part, a lot of this hasn’t changed and OctoCam generally continues to operate the same today. It is impressive to see that I was able to build this system of relative complexity back in college and have it still work!
And that will be all for OctoCam. It’s been a wonderful project many years in the making and I hope it continues to stay that way. OctoCam has gone above and beyond my imaginations, especially for how much it has captured and how long it has gone on for - it’s been an absolute joy.
At this point, you may want to check out the OctoCam (v0) project in experiments to see a super early version of the OctoCam stack!